欢迎加入.net意社区,第一时间了解我们的动态,地址:ccnetcore.com
最近遇到很多小伙伴们问我,自己会.netframework想学.netcore,到底难不难,思考一下,其实基本大同小异,区别比较大的,主要是.netcore的管道模型
所以这篇文章,我们针对管道模型来玩一下,来看看它到底是个啥?
1、理论说到管道模型,那我就不得不搬出下面这种经典图了:
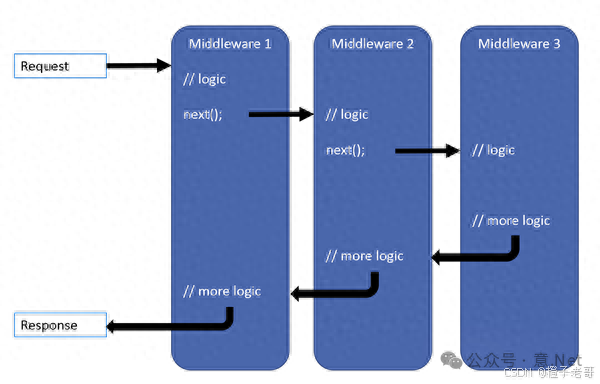
.netcore的管道模型,类似一个俄罗斯套娃,从请求进来到请求出去,依次按照我们添加管道模型的顺序去执行
它的本质是属于一种特殊的 责任链 设计模式,不熟悉的人可以多去了解一下这个设计模式,真的很实用,主要是用于处理大量的if else等流程类型的业务,平替面向过程的不二之选
对于http请求,用管道模型,可谓是再合适不过了。
同时,每一个管道,又可以叫做中间件,对请求做了一个aop的操作,不就是中间件做的事情吗?很多中间件的功能都可以直接做成一个nuget包,引入到程序内部的管道模型中。微软考虑了这一点,也是用心了。
至于管道模型如何使用,网上资料很多,这里就不赘述了,本文主要以底层原理如何实现为主。
2、源码实现入口:在创建一个.netcore的web api程序,我们可以在program中build之后添加自己的管道
var app = builder.Build();app.Use((context,next)=>{Console.WriteLine("执行管道1");returnnext();});app.Use((context,next)=>{Console.WriteLine("执行管道2");returnnext();});我们往use里面看看,我们自定义的管道模型是如何跑到进去的
WebApplication:public IApplicationBuilder Use(Func<RequestDelegate, RequestDelegate> middleware) {this.ApplicationBuilder.Use(middleware);return (IApplicationBuilder) this; }调用的WebApplication.use方法,走到this.ApplicationBuilder
如果熟悉.net5的伙伴们,肯定清楚WebApplication是后来新增的类,其实就是对ApplicationBuilder等元素包了一层,更方面我们使用,所以我们看看ApplicationBuilder内,use是做了什么
ApplicationBuilder:public IApplicationBuilder Use(Func<RequestDelegate, RequestDelegate> middleware) { _components.Add(middleware); _descriptions?.Add(CreateMiddlewareDescription(middleware));return this; }好像,没有做什么,只是把传入的Func<RequestDelegate, RequestDelegate> middleware一个委托丢到了_components,临时存储了起来而已
那我们刚好看看,存起来之后,如在哪里使用了,看到它的build方法,核心
public RequestDelegate Build(){RequestDelegate app = context =>{// If we reach the end of the pipeline, but we have an endpoint, then something unexpected has happened.// This could happen if user code sets an endpoint, but they forgot to add the UseEndpoint middleware.var endpoint = context.GetEndpoint();var endpointRequestDelegate = endpoint?.RequestDelegate;if(endpointRequestDelegate !=){var message =$"The request reached the end of the pipeline without executing the endpoint: '{endpoint!.DisplayName}'. "+$"Please register the EndpointMiddleware using '{nameof(IApplicationBuilder)}.UseEndpoints(...)' if using "+$"routing.";thrownewInvalidOperationException(message);}// Flushing the response and calling through to the next middleware in the pipeline is// a user error, but don't attempt to set the status code if this happens. It leads to a confusing// behavior where the client response looks fine, but the server side logic results in an exception.if(!context.Response.HasStarted){ context.Response.StatusCode=StatusCodes.Status404NotFound;}// Communicates to higher layers that the request wasn't handled by the app pipeline. context.Items[RequestUnhandledKey]=true;returnTask.CompletedTask;};for(var c = _components.Count-1; c >=0; c--){ app = _components[c](app);}return app; }这里其实就是管道模型的核心,看起来很多,其实大部分都是在做校验,我们简化一下
public RequestDelegate Build(){RequestDelegate app = context =>returnTask.CompletedTask;//倒叙遍历for(var c = _components.Count-1; c >=0; c--){//_components是我们之前新增的中间件存储的地方 app = _components[c](app);}return app; }哈哈,是不是一目了然,先创建一个初始化的节点,将我们之前传入的_components中间件委托进行一个倒叙的遍历
不过,到这里,我们的中间件并不会执行,这里很巧妙,由于我们传入的是Func<RequestDelegate, RequestDelegate> middleware,委托入参、委托出参,传入初始化的委托RequestDelegate app,返回的还是一个委托,刚好通过倒叙遍历的方式,将执行顺序调转回来
所以这个方法返回的是public RequestDelegate Build()RequestDelegate,只有在真正去执行RequestDelegate的地方才会去真正执行
这里刚好和我们的管道模型执行流程对应上了,我们给管道模型新增中间件的时候,并不会执行,而只有到有请求进来的时候,才会执行这个委托
然后呢?没了。。管道模型看起来复杂,其实真的很简单,实现起来就是一个集合一个倒叙遍历
扮猪吃老虎?并不是,我们只是站在巨人的肩膀上。不是因为它看起内容少,所以简单;而是因为它设计的巧妙,所以看起来内容少简单
3、扩展学以致用,管道模型不光只是在启动的时候使用,可以看到.netcore源码内,有着非常非常多的管道,每个管道的职责不一样,我们当然可以通过自己创建管道,来解决我们的业务,下面自定义管道模型使用:
1:中间件接口 首先,我们定义一个中间件接口 IMiddleware。
public interface IMiddleware{ Task InvokeAsync(HttpContext context, Func<HttpContext, Task> next);}HttpContext 类 接下来,我们定义一个简单的 HttpContext,用于存储请求上下文信息。
publicHttpContext{publicstringRequest{get;set;}publicstringResponse{get;set;}}示例中间件 我们创建几个示例中间件来处理请求。
publicMiddleware1:IMiddleware{public async Task InvokeAsync(HttpContext context, Func<HttpContext, Task> next){Console.WriteLine("Middleware1 before");awaitnext(context);Console.WriteLine("Middleware1 after");}}publicclassMiddleware2:IMiddleware{public async Task InvokeAsync(HttpContext context, Func<HttpContext, Task> next){Console.WriteLine("Middleware2 before");awaitnext(context);Console.WriteLine("Middleware2 after");}}中间件管道 接下来,我们要创建一个管道类,负责执行中间件。
publicMiddlewarePipeline{privatereadonlyList<IMiddleware> _middlewares =newList<IMiddleware>();public void Use(IMiddleware middleware){ _middlewares.Add(middleware);}public async Task ExecuteAsync(HttpContext context){Func<HttpContext,Task>next=;// 构建next委托next=async(ctx)=>{// 如果还有中间件未执行,则继续下一个中间件var index =0;awaitExecuteMiddleware(ctx, index);};awaitnext(context);}private async Task ExecuteMiddleware(HttpContext context, int index){if(index < _middlewares.Count){var middleware = _middlewares[index];await middleware.InvokeAsync(context,async(ctx)=>{// 调用下一个中间件awaitExecuteMiddleware(ctx, index +1);});}}}使用示例 最后,我们使用以上创建的管道和中间件。
class Program{static async Task Main(string[] args){var pipeline =newMiddlewarePipeline(); pipeline.Use(newMiddleware1()); pipeline.Use(newMiddleware2());var context =newHttpContext{Request="Request Data"};await pipeline.ExecuteAsync(context);}}运行结果
Middleware1 beforeMiddleware2 beforeMiddleware2 afterMiddleware1 after学会这个,速速将屎山重构吧!