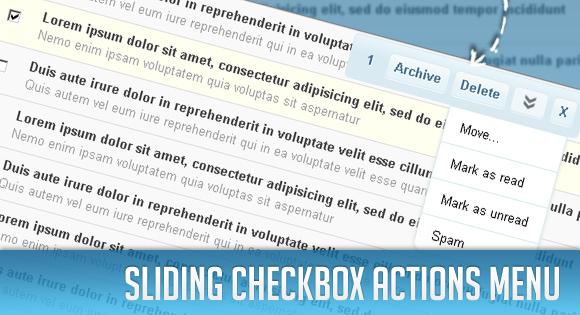
在本教程中,我们将在选中复选框时,使用jQuery创建一个操作菜单。这可能是一个非常有用的UI属性,因为我们不强制用户滚动到操作所在的位置——只要用户需要,它们就会出现。
此外,用户可以将动作框拖到更实用的位置,当用户滚动页面时,该框将始终跟随。它还将显示选中了多少个复选框。
我们将使用一个表作为示例。通常,操作被放置在表的顶部和底部,如果这个表不太大,就可以了。但是由于我们无法控制用户的viewport的大小,所以不能保证操作接近于用户的关注点。有了这个解决方案,用户就可以很容易地在选定的项目上执行某些操作。
本教程的灵感来自于移动版Gmail的一个类似功能。如果你在iPhone或iPod Touch上的Safari浏览器中打开Gmail账户,你会注意到这个小小的帮助菜单。
让我们开始吧。

对于标记,我们将简单地创建一个带有ID和一些复选框的表:
<table id="mytable"> <tr> <td class="check"> <input id="check_1" name="check_1" type="checkbox" value="1" /> </td> <td>Some Content</td> </tr> <tr> <td class="check"> <input id="check_2" name="check_2" type="checkbox" value="2" /> </td> <td>Some Content</td> </tr></table>对于actions菜单,我们将有以下标记:
<div id="actionsBox" class="actionsBox"> <div id="actionsBoxMenu" class="menu"> <span id="cntBoxMenu"></span> <a class="button box_action">Archive</a> <a class="button box_action">Delete</a> <a id="toggleBoxMenu" class="open"></a> <a id="closeBoxMenu" class="button">X</a> </div> <div class="submenu" style="display:none;"> <a class="first box_action">Move...</a> <a class="box_action">Mark as read</a> <a class="box_action">Mark as unread</a> <a class="last box_action">Spam</a> </div></div>当我们用ID togglebox菜单点击a的时候,就会出现这个带有类子菜单的div。
CSS在下面,我们将看一下动作框的样式。我们将使用大量的CSS 3属性,所以如果你想让它在古老的浏览器中运行,你将不得不使用图像来调整这个小菜单。
我们首先要隐藏整个菜单。因此,actionsBox div将有以下样式:
.actionsBox{ font-size:13px; font-family:Helvetica,Arial,Verdana; font-style:normal; left:50%; position:absolute; top:-50px; opacity:0; cursor:move;}带有按钮的主菜单将被设计为如下:
.actionsBox .menu{ color:#47708F; width:240px; line-height:30px; text-shadow:1px 1px 0px #fff; padding:7px; -moz-border-radius:5px; -webkit-border-radius:5px; border-radius:5px; font-weight:bold; border:1px solid #D9EAF2; background:#e8f4fa; background: -webkit-gradient( linear, left bottom, left top, color-stop(0.58, rgb(217,234,242)), color-stop(0.93, rgb(232,244,250)) ); background: -moz-linear-gradient( center bottom, rgb(217,234,242) 58%, rgb(232,244,250) 93% ); -moz-box-shadow:1px 1px 3px #999; -webkit-box-shadow:1px 1px 3px #999; box-shadow:1px 1px 3px #999; }我们在这里大量使用CSS3:渐变,圆形边框,方框和文本阴影都将创造出一种漂亮的效果,这将使图片的使用变得不必要。
按钮,将是链接元素,将有以下风格:
.actionsBox .menu .button{ padding:4px 7px; border:1px solid #D9EAF2; cursor:pointer; background:#e8f4fa; background: -webkit-gradient( linear, left bottom, left top, color-stop(0.38, rgb(230,243,249)), color-stop(0.88, rgb(245,249,250)) ); background: -moz-linear-gradient( center bottom, rgb(230,243,249) 38%, rgb(245,249,250) 88% ); -moz-border-radius:5px; -webkit-border-radius:5px; border-radius:5px; -moz-box-shadow:0px 1px 0px #f9f9f9; -webkit-box-shadow:0px 1px 0px #f9f9f9; box-shadow:0px 1px 0px #f9f9f9; }有了很轻的盒子阴影,我们创造了一个微刻的效果。当我们悬停时,我们希望元素得到白色背景:
.actionsBox .menu .button:hover{ background:#fff;}菜单中的跨度用于显示选中的复选框的数量:
.actionsBox .menu span{ padding:0px 10px;}子菜单最初不会显示。我们将在其底部给它一个圆形边界:
.actionsBox .submenu{ display:none; width:120px; margin-left:100px; top:46px; right:10px; background:#fff; border:1px solid #D9EAF2; border-top:none; -moz-border-radius:0px 0px 10px 10px; -webkit-border-bottom-left-radius:10px; -webkit-border-bottom-right-radius:10px; border-bottom-left-radius:10px; border-bottom-right-radius:10px; -moz-box-shadow:0px 1px 4px #ddd; -webkit-box-shadow:0px 1px 4px #ddd; box-shadow:0px 1px 4px #ddd;}.actionsBox .submenu a{ display:block; cursor:pointer; padding:10px 15px; border-top:1px solid #D9EAF2;}最后一项也将在底部有一个圆形边界:
.actionsBox .submenu a.last{ -moz-border-radius:0px 0px 10px 10px; -webkit-border-bottom-left-radius:10px; -webkit-border-bottom-right-radius:10px; border-bottom-left-radius:10px; border-bottom-right-radius:10px;}第一个项目的顶部没有边界:
.actionsBox .submenu a.first{ border-top:none;}.actionsBox .submenu a:hover{ background-color:#f9f9f9;}开放/关闭项目将有以下风格:
.actionsBox .menu a.open,.actionsBox .menu a.closed{ border:1px solid #D9EAF2; padding:4px 17px; -moz-border-radius:5px; -webkit-border-radius:5px; border-radius:5px; -moz-box-shadow:0px 1px 0px #f9f9f9; -webkit-box-shadow:0px 1px 0px #f9f9f9; box-shadow:0px 1px 0px #f9f9f9; cursor:pointer; opacity:0.6; margin-right:5px;}.actionsBox .menu a.open{ background:#fff url(../open.png) no-repeat center center;}.actionsBox .menu a.closed{ background:#fff url(../closed.png) no-repeat center center;}.actionsBox .menu a.open:hover,.actionsBox .menu a.closed:hover{ opacity:1.0;}这就是风格。当然,如果您要在web应用程序中使用这个,您将不得不适应它。在IE中,您可以看到样式保持非常简单。
现在,让我们添加jQuery魔术!
JavaScript首先,让我们包括jQuery脚本和jQuery UI脚本,因为我们将使我们的小菜单成为可拖动的。
所以,主要的想法是当用户检查一个复选框时,让我们的菜单出现。我们也希望它在没有选中的复选框时消失,我们想让菜单变得可拖动。另外,当用户滚动页面时,菜单应该跟随用户。
我们还将在选择复选框时将表行的类更改为“selected”。(您可以在ZIP文件中查看表和该类的样式。)
我们增加以下功能:
$(function() { /* tells us if we dragged the box */ var dragged = false; /* timeout for moving the box when scrolling the window */ var moveBoxTimeout; /* make the actionsBox draggable */ $('#actionsBox').draggable({ start: function(event, ui) { dragged = true; }, stop: function(event, ui) { var $actionsBox = $('#actionsBox'); /* calculate the current distance from the window's top until the element; this value is going to be used later on, to move the box after we scroll */ $actionsBox.data('distanceTop',parseFloat($actionsBox.css('top'),10) - $(document).scrollTop()); } }); /* when clicking on an input (checkbox), change the class of the table row, and show the actions box */ $('#mytable input[type="checkbox"]').bind('click',function(e) { var $this = $(this); if($this.is(':checked')) $this.parents('tr:first').addClass('selected'); else $this.parents('tr:first').removeClass('selected'); showActionsBox(); }); function showActionsBox(){ /* number of checked inputs */ var BoxesChecked = $('#mytable input:checked').length; /* update the number of checked inputs */ $('#cntBoxMenu').html(BoxesChecked); /* if there is at least one selected, show the BoxActions Menu otherwise hide it */ var $actionsBox = $('#actionsBox'); if(BoxesChecked > 0){ /* if we didn't drag, then the box stays where it is; we know that the position is the document's current top plus the previous distance that the box had relative to the window's top (distanceTop) */ if(!dragged) $actionsBox.stop(true).animate({ 'top': parseInt(15 + $(document).scrollTop()) + 'px', 'opacity':'1' },500); else $actionsBox.stop(true).animate({ 'top': parseInt($(document).scrollTop() + $actionsBox.data('distanceTop')) + 'px', 'opacity':'1' },500); } else{ $actionsBox.stop(true).animate({ 'top': parseInt($(document).scrollTop() - 50) + 'px', 'opacity':'0' },500,function(){ $(this).css('left','50%'); dragged = false; /* if the submenu was open we hide it again */ var $toggleBoxMenu = $('#toggleBoxMenu'); if($toggleBoxMenu.hasClass('closed')){ $toggleBoxMenu.click(); } }); } } /* when scrolling, move the box to the right place */ $(window).scroll(function(){ clearTimeout(moveBoxTimeout); moveBoxTimeout = setTimeout(showActionsBox,500); }); /* open sub box menu for other actions */ $('#toggleBoxMenu').toggle( function(e){ $(this).addClass('closed').removeClass('open'); $('#actionsBox .submenu').stop(true,true).slideDown(); }, function(e){ $(this).addClass('open').removeClass('closed'); $('#actionsBox .submenu').stop(true,true).slideUp(); }); /* close the actions box menu: hides it, and then removes the element from the DOM, meaning that it will no longer appear */ $('#closeBoxMenu').bind('click',function(e){ $('#actionsBox').animate({ 'top':'-50px', 'opacity':'0' },1000,function(){ $(this).remove(); }); }); /* as an example, for all the actions (className:box_action) alert the values of the checked inputs */ $('#actionsBox .box_action').bind('click',function(e){ var ids = ''; $('#mytable input:checked').each(function(e,i){ var $this = $(this); ids += 'id : ' + $this.attr('id') + ' , value : ' + $this.val() + '\n'; }); alert('checked inputs:\n'+ids); });});关闭按钮将使操作框完全消失。你可以通过调整函数来改变这种行为。你可能想让用户在点击更多的复选框后返回他的菜单。
最后一个函数是如何获取已检查项的值的示例。您可以根据您的需要调整它,并进一步处理已检查的值。
这是它!我希望你喜欢它,觉得它有用!
注::为了充分体验你所能做的,滚动页面,选择一些复选框并拖动菜单。当您再次滚动页面时,您将看到菜单如何跟随您。
