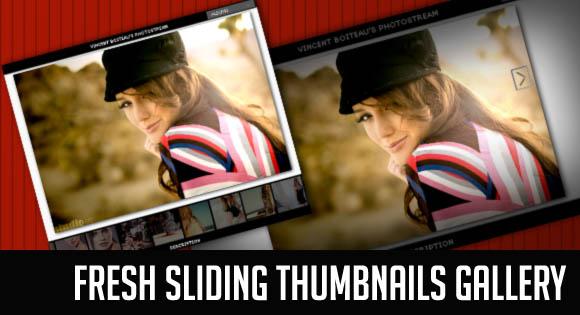
在本教程中,我们将创建另一个完整的页面图像库,并在移动鼠标时自动滚动。这样做的目的是让用户通过点击它来稍微放大图片。缩略图条向下滑动,图像根据屏幕大小调整大小。
thumbnails bar的滚动功能是基于Andrew Valums的优秀指南:用CSS和jQuery制作的水平滚动菜单。
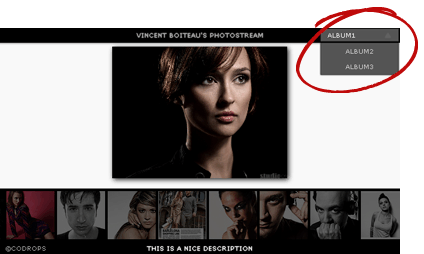
此外,我们将使用PHP从文件夹结构中自动获取图像和拇指。文件夹将包含相册子文件夹,我们将为画廊添加一个选择选项,允许选择相册。
就像使用jQuery的滑动面板照片墙图库一样,我们将使用一个resize函数来显示图像。
我们还将添加一个XML文件(可选地)包含图像的描述。
我们要添加的另一个简洁的功能是改变光标:不同模式和位置的完整图像,光标将改变一个向左或向右箭头(浏览图片),或正负符号(放大或缩小)。
演示中的美丽图片来自于模型1 - photo拍摄的相册来自于Flickr上的文森特·博伊奥的照片流。
我们也有一个静态版本的图像画廊没有相册选项。您可以在本文末尾找到演示链接和ZIP文件。
别忘了看看这个图片库的移动版本的教程:令人敬畏的移动图片画廊网络应用
所以,让我们开始吧!

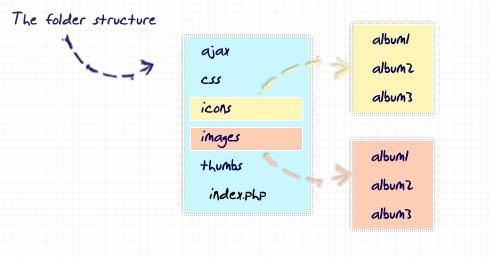
今天,我们将从文件夹结构开始这个教程,因为它对我们的PHP功能很重要。
PHP的必要文件夹是图像文件夹和拇指文件夹。它们都需要位于根文件夹(在这里您将有索引)。php文件)。
任何相册子文件夹将在拇指文件夹中,也需要在images文件夹中。所以,如果我们有拇指/ album1/22.jpg我们还需要图片/ album1/22.jpg将全尺寸图像。

有了这个组织,我们将能够自动显示相册缩略图并为所有相册创建一个选择框。
在每个拇指的相册文件夹中,我们还将有一个XML文件,其中包含对图像的描述。我们将调用那个文件desc.xml。添加对图像的描述不是强制性的,也就是说,我们只需要阅读那些图片。XML文件的结构如下:
<descriptions> <image> <name>1.jpg</name> <text>This is a nice description</text> </image> <image> <name>2.jpg</name> <text>red!</text> </image> <image> <name>3.jpg</name> <text>another one...</text> </image> ... </descriptions>很重要的一点是,我们要正确地将这些图像命名为标签。
另外,确保文件夹中没有其他文件。
标记和PHP让我们看一下HTML和PHP。我们有一个简单的结构,它将由PHP和JavaScript代码动态地“填充”:
<div class="albumbar"> <span>Vincent Boiteau's photostream</span> <div id="albumSelect" class="albumSelect"> <ul> <!-- We will dynamically generate the items --> <?php $firstAlbum = ''; $i=0; if(file_exists('images')) { $files = array_slice(scandir('images'), 2); if(count($files)) { natcasesort($files); foreach($files as $file) { if($file != '.' && $file != '..') { if($i===0) $firstAlbum = $file; else echo "<li><a>$file</a></li>"; ++$i; } } } } ?> </ul> <div class="title down"> <?php echo $firstAlbum;?> </div> </div> </div> <div id="loading"></div> <div id="preview"> <div id="imageWrapper"> </div> </div> <div id="thumbsWrapper"> </div> <div class="infobar"> <span id="description"></span> </div>选择框项动态生成:我们检查images文件夹中的子文件夹,并将所有名称放入我们的项目中。第一张专辑将默认为“精选”。

当我们点击其中的一个项目时,我们会称之为“拇指”。php(在ajax文件夹中)从JavaScript内。我们将返回一个数组(JSON),其中包含我们需要构建缩略图的所有信息。让我们先看一下PHP代码,然后再看JS:
$album = $_GET['album']; $imagesArr = array(); $i = 0; /* read the descriptions xml file */ if(file_exists('../thumbs/'.$album.'/desc.xml')) { $xml = simplexml_load_file('../thumbs/'.$album.'/desc.xml'); } /* read the images from the album and get the * description from the XML file: */ if(file_exists('../thumbs/'.$album)) { $files = array_slice(scandir('../thumbs/'.$album), 2); if(count($files)) { foreach($files as $file) { if($file != '.' && $file != '..' && $file!='desc.xml') { if($xml) { $desc = $xml->xpath('image[name="'.$file.'"]/text'); $description = $desc[0]; if($description=='') $description = ''; } $imagesArr[] = array('src' => 'thumbs/'.$album.'/'.$file, 'alt' => 'images/'.$album.'/'.$file, 'desc' => $description); } } } } $json = $imagesArr; $encoded = json_encode($json); echo $encoded; unset($encoded);因此,我们基本上获得了所请求的相册的所有缩略图,并为每个img元素准备信息。我们将在HTML中添加的最后一个元素将包含一个alt属性,该属性包含了完整的图像位置作为值,以及一个title属性,该属性包含了将图片作为值的描述。对图像的描述取自我们前面提到的XML文件。使用xpath表达式,我们得到包含图像名称的节点“name”,然后我们得到描述的文本。在JS中,我们会说description应该是“title”属性的值。
现在,让我们来看看它的风格。
CSS首先,我们将向正文添加一些缺省样式:
body{ font-family:Verdana; text-transform:uppercase; color:#fff; font-size:10px; overflow:hidden; background-color:#f9f9f9; }现在的背景颜色几乎是白色的,但是你可以尝试其他颜色,它看起来真的很棒!
让我们为页面标题设计一个相册栏:
.albumbar{ height:24px; line-height:24px; text-align:center; position:fixed; background-color:#000; left:0px; width:100%; top:0px; -moz-box-shadow:-2px 0px 4px #333; -webkit-box-shadow:-2px 0px 4px #333; box-shadow:-2px 0px 4px #333; z-index:11; }还有一个包含对每个图像的描述的信息栏:
.infobar{ height:22px; line-height:22px; text-align:center; position:fixed; background-color:#000; left:0px; width:100%; bottom:0px; -moz-box-shadow:0px -1px 2px #000; -webkit-box-shadow:0px -1px 2px #000; box-shadow:0px -1px 2px #000; } span#description, .albumbar span{ text-shadow:0px 0px 1px #fff; color:#fff; } .albumbar span a{ color:#aaa; text-decoration:none; } .albumbar span a:hover{ color:#ddd; }信息栏和相册栏将固定在页面的顶部和底部。
选择框和内部列表的样式如下:
.albumSelect{ height:18px; line-height:18px; position:absolute; right:5px; top:2px; width:120px; } .albumSelect .title{ color:#f0f0f0; z-index:10; border:1px solid #444; background-color:#555; background-repeat:no-repeat; background-position:90% 50%; cursor:pointer; text-align:left; text-indent:10px; width:100%; position:absolute; top:0px; left:0px; }标题div将会有一个小三角形作为背景图像。我们定义了上下两个类,然后根据是否扩展专辑列表来动态设置:
.down{ background-image:url(../icons/down.png); } .up{ background-image:url(../icons/up.png); }带有所有相册的无序列表将按如下方式设计:
.albumSelect ul { list-style:none; display:none; padding:0px; width:100%; border:1px solid #444; background-color:#555; margin:22px 0px 0px 0px; -moz-box-shadow:0px 0px 2px #000; -webkit-box-shadow:0px 0px 2px #000; box-shadow:0px 0px 2px #000; } .albumSelect ul li a{ text-decoration:none; cursor:pointer; display:block; padding:3px 0px; color:#ccc; } .albumSelect ul li a:hover{ background-color:#000; color:#fff; }列表将会显示:在开始时没有一个列表,因为当用户点击三角形扩展它时,我们只希望它出现。
加载容器将被设置为显示在页面的中心位置,因为我们有缩略图条出现,所以只需要稍微多一点。把最高的40%给我们需要的是:
#loading{ display:none; width:50px; height:50px; position:absolute; top:40%; left:50%; margin-left:-24px; background:transparent url(../icons/loading.gif) no-repeat top left; }要使拇指棒滚动,我们需要给它一个特殊的样式。该缩略图将完全定位并占据窗口的宽度。我们将垂直溢出设置为隐藏,因为我们不希望任何滚动条出现在右边。
水平溢出将在JavaScript中管理(它将被隐藏)。
#thumbsWrapper{ position: absolute; width:100%; height:102px; overflow-y:hidden; background-color:#000; bottom:0px; left:0px; border-top:2px solid #000; }该缩略图容器将是具有与所有缩略图宽度的总和相等的宽度的内div。我们会在JavaScript中动态地计算宽度,所以我们不会在类中定义它:
#thumbsContainer{ height:79px; display:block; margin: 0; }缩略图将有以下样式:
#thumbsWrapper img{ float:left; margin:2px; display:block; cursor:pointer; opacity:0.4; filter:progid:DXImageTransform.Microsoft.Alpha(opacity=40); }我们给它们一个低透明度值,因为我们想添加悬浮效果。
包含完整图像的imageWrapper有以下样式:
#imageWrapper{ position:relative; text-align:center; padding-top:30px; }我们添加了一个顶部的填充,因为我们在页面顶部有了一个唱片条。我们不想让图像被它隐藏。边缘0自动将图像的水平中心:
#imageWrapper img{ margin:0 auto; -moz-box-shadow:2px 2px 10px #111; -webkit-box-shadow:2px 2px 10px #111; box-shadow:2px 2px 10px #111; }我们还为所有现代浏览器创建了一个整洁的框阴影:
有些人可能想知道为什么我们在图像包装中设置文本对齐的中心,如果我们在图像中有空白。当我们在jQuery中使用fadeIn函数进行显示时,各个元素的显示会变成“块”。对于这种情况,我们的“margin:0 auto”将为图像提供中心。但是当我们把第一个图像放在初始位置时,我们需要内联中心属性,这是给父“文本对齐:中心”。
最后,我们为不同的游标类型定义类:
.cursorRight{ .cursorRight{ cursor:url("../icons/next.cur"), url("icons/next.cur"), default; } .cursorLeft{ cursor:url("../icons/prev.cur"), url("icons/prev.cur"), default; } .cursorPlus{ cursor:url("../icons/plus.cur"), url("icons/plus.cur"), default; } .cursorMinus{ cursor:url("../icons/minus.cur"), url("icons/minus.cur"), default; }好吧,这基本上是一种黑客行为,并不是很好,但是这种丑陋的原因是浏览器的处理。第一个url是FireFox的路径,第二个是IE的,默认值需要在FireFox中再次出现。在此阅读更多关于自定义游标和跨浏览器兼容性的内容。
现在,我们来看看JavaScript。
JavaScript让我们一步一步地通过jQuery代码。我不会按照它在脚本中的顺序,而是使用函数的用法。我希望这样更容易理解。
在$(函数){}中,我们将添加以下JavaScript:
/* name of the selected album, in the top right combo box */ var album = $('#albumSelect div').html(); /* mode is small or expanded, depending on the picture size */ var mode = 'small'; /* this is the index of the last clicked picture */ var current = 0;因此,我们首先声明一些我们稍后需要的变量,然后我们调用:
buildThumbs();buildThumbs()函数将获得当前的相册,并生成具有相应的源和信息的图像:
function buildThumbs(){ current=1; $('#imageWrapper').empty(); $('#loading').show(); $.get('ajax/thumbs.php?album='+album, function(data) { var countImages = data.length; var count = 0; var $tContainer = $('<div/>',{ id : 'thumbsContainer', style : 'visibility:hidden;' }) for(var i = 0; i < countImages; ++i){ try{ var description = data[i].desc[0]; }catch(e){ description=''; } if(description==undefined) description=''; $('<img title="'+description+'" alt="'+data[i].alt+'" height="75" />').load(function(){ var $this = $(this); $tContainer.append($this); ++count; if(count==1){ /* load 1 image into container*/ $('<img id="displayed" style="display:block;" class="cursorPlus"/>').load(function(){ var $first = $(this); $('#loading').hide(); resize($first,0); $('#imageWrapper').append($first); $('#description').html($this.attr('title')); }).attr('src',$this.attr('alt')); } if(count == countImages){ $('#thumbsWrapper').empty().append($tContainer); thumbsDim($tContainer); makeScrollable($('#thumbsWrapper'),$tContainer,15); } }).attr('src',data[i].src); } },'json'); }如前所述,我们将使用拇指。php文件来获取我们需要的信息。当我们构建所有的拇指图像时,我们将它附加到thumbsWrapper中,并使用thumbsDim(第36行)来确定容器的大小:
/* adjust the size (width) of the scrollable container - this depends on all its images widths */ function thumbsDim($elem){ var finalW = 0; $elem.find('img').each(function(i){ var $img = $(this); finalW+=$img.width()+5; //plus 5 -> 4 margins + 1 to avoid rounded calculations }); $elem.css('width',finalW+'px').css('visibility','visible'); }然后我们使用makeScrollable(第37行)来让缩略图容器可以通过鼠标移动来滚动:
//Get our elements for faster access and set overlay width function makeScrollable($wrapper, $container, contPadding){ //Get menu width var divWidth = $wrapper.width(); //Remove scrollbars $wrapper.css({ overflow: 'hidden' }); //Find last image container var lastLi = $container.find('img:last-child'); $wrapper.scrollLeft(0); //When user move mouse over menu $wrapper.unbind('mousemove').bind('mousemove',function(e){ //As images are loaded ul width increases, //so we recalculate it each time var ulWidth = lastLi[0].offsetLeft + lastLi.outerWidth() + contPadding; var left = (e.pageX - $wrapper.offset().left) * (ulWidth-divWidth) / divWidth; $wrapper.scrollLeft(left); }); }下面的函数处理缩略图上的单击事件,以及鼠标悬停事件:
/* clicking on a thumb loads the image (alt attribute of the thumb is the source of the large image); mouseover and mouseout for a nice spotlight hover effect */ $('#thumbsContainer img').live('click',function(){ loadPhoto($(this),'cursorPlus'); }).live('mouseover',function(){ var $this = $(this); $this.stop().animate({ 'opacity':'1.0' },200); }).live('mouseout',function(){ var $this = $(this); $this.stop().animate({ 'opacity':'0.4' },200); });当单击缩略图时,我们调用函数loadPhoto(我们还通过当前的光标模式):
/* loads a picture into the imageWrapper the image source is in the thumb's alt attribute */ function loadPhoto($thumb,cursorClass){ current = $thumb.index()+1; $('#imageWrapper').empty(); $('#loading').show(); $('<img id="displayed" title="'+$thumb.attr('title')+'" class="'+cursorClass+'" style="display:none;"/>').load(function(){ var $this = $(this); $('#loading').hide(); resize($this,0); if(!$('#imageWrapper').find('img').length){ $('#imageWrapper').append($this.fadeIn(1000)); $('#description').html($this.attr('title')); } }).attr('src',$thumb.attr('alt')); }当我们调整窗口大小时,想要调整图片的大小:
/* when resizing the window resize the picture */ $(window).bind('resize', function() { resize($('#displayed'),0); });resize函数定义如下:
/* function to resize an image based on the windows width and height */ function resize($image, type){ var widthMargin = 10 var heightMargin = 0; if(mode=='expanded') heightMargin = 60; else if(mode=='small') heightMargin = 150; //type 1 is animate, type 0 is normal var windowH = $(window).height()-heightMargin; var windowW = $(window).width()-widthMargin; var theImage = new Image(); theImage.src = $image.attr("src"); var imgwidth = theImage.width; var imgheight = theImage.height; if((imgwidth > windowW)||(imgheight > windowH)){ if(imgwidth > imgheight){ var newwidth = windowW; var ratio = imgwidth / windowW; var newheight = imgheight / ratio; theImage.height = newheight; theImage.width= newwidth; if(newheight>windowH){ var newnewheight = windowH; var newratio = newheight/windowH; var newnewwidth =newwidth/newratio; theImage.width = newnewwidth; theImage.height= newnewheight; } } else{ var newheight = windowH; var ratio = imgheight / windowH; var newwidth = imgwidth / ratio; theImage.height = newheight; theImage.width= newwidth; if(newwidth>windowW){ var newnewwidth = windowW; var newratio = newwidth/windowW; var newnewheight =newheight/newratio; theImage.height = newnewheight; theImage.width= newnewwidth; } } } if((type==1)&&(!$.browser.msie)) $image.stop(true).animate({ 'width':theImage.width+'px', 'height':theImage.height+'px' },1000); else $image.css({ 'width':theImage.width+'px', 'height':theImage.height+'px' }); }这个高度取决于我们所处的模式:如果缩略图条没有了,那么我们的空间就更少了,因此我们减少了图像的允许高度。
下面的函数将处理当我们选择一个相册时会发生什么:
/* Album combo events to open, close, and select an album from the combo */ $('#albumSelect div').bind('click',function(){ var $this = $(this); if($this.is('.up')) closeAlbumCombo(); else if($this.is('.down')) openAlbumCombo(); }); $('#albumSelect ul > li').bind('click',function(){ var $this = $(this); album = $this.find('a').html(); buildThumbs(); var $combo = $('#albumSelect div'); $this.find('a').html($combo.html()); $combo.html(album); closeAlbumCombo(); orderCombo($this.parent()); });这些是我们自制组合框的三个功能:
//functions to control the albums combos function closeAlbumCombo(){ var $combo = $('#albumSelect div'); $combo.addClass('down').removeClass('up'); $combo.prev().hide(); } function openAlbumCombo(){ var $combo = $('#albumSelect div'); $combo.addClass('up').removeClass('down'); $combo.prev().show(); } function orderCombo($ul){ var items = $ul.find('li').get(); items.sort(function(a,b){ var keyA = $(a).text(); var keyB = $(b).text(); if (keyA < keyB) return -1; if (keyA > keyB) return 1; return 0; }); $.each(items, function(i, li){ $ul.append(li); }); }现在我们定义当我们悬停在主图像上或者点击它时发生了什么。根据鼠标悬停在图像上的位置,我们需要一个特定的光标出现。因为我们检查了鼠标的位置,并将有关类应用到图像上:
/* when hovering the main image change the mouse icons (left,right,plus,minus) also when clicking on the image, expand it or make it smaller depending on the mode */ $('#displayed').live('mousemove',function(e){ var $this = $(this); var imageWidth = parseFloat($this.css('width'),10); var x = e.pageX - $this.offset().left; if(x<(imageWidth/3)) $this.addClass('cursorLeft') .removeClass('cursorPlus cursorRight cursorMinus'); else if(x>(2*(imageWidth/3))) $this.addClass('cursorRight') .removeClass('cursorPlus cursorLeft cursorMinus'); else{ if(mode=='expanded'){ $this.addClass('cursorMinus') .removeClass('cursorLeft cursorRight cursorPlus'); } else if(mode=='small'){ $this.addClass('cursorPlus') .removeClass('cursorLeft cursorRight cursorMinus'); } } }).live('click',function(){ var $this = $(this); if(mode=='expanded' && $this.is('.cursorMinus')){ mode='small'; $this.addClass('cursorPlus') .removeClass('cursorLeft cursorRight cursorMinus'); $('#thumbsWrapper').stop().animate({ 'bottom':'0px' },300); resize($this,1); } else if(mode=='small' && $this.is('.cursorPlus')){ mode='expanded'; $this.addClass('cursorMinus') .removeClass('cursorLeft cursorRight cursorPlus'); $('#thumbsWrapper').stop().animate({ 'bottom':'-85px' },300); resize($this,1); } else if($this.is('.cursorRight')){ var $thumb = $('#thumbsContainer img:nth-child('+parseInt(current+1)+')'); if($thumb.length){ ++current; loadPhoto($thumb,'cursorRight'); } } else if($this.is('.cursorLeft')){ var $thumb = $('#thumbsContainer img:nth-child('+parseInt(current-1)+')'); if($thumb.length){ --current; loadPhoto($thumb,'cursorLeft'); } } });当我们点击图像时,我们会检查我们拥有的光标,因为我们知道接下来要显示的图像(即下一个或前一个)。我们的“当前”变量可以帮助我们跟踪当前正在查看的图像。
这是它!我希望你喜欢这个巨大的教程!
请注意,在这个演示中,我们没有使用非常大的图像,所以“放大”/调整大小只会显示整个图像的最大值,并且不会改变图片的真实尺寸。如果你使用非常大的图片,效果将对大屏幕的用户来说是一个不错的体验。
视图demoDownload源 我们还有这个相册功能的静态版本。查看静态demo或下载ZIP文件。
我们创建了一个移动版本的这个画廊:令人敬畏的移动图像画廊网络应用。
