在本文中,将介绍如何使用 tkinter PanedWindow 窗格窗口小部件。PanedWindow 小部件是一个容器,可以在窗体上创建可以调节大小的区域,这些区域称作窗格。
要创建小组件,请使用以下语法:
tk.PanedWindow(master, **options)
PanedWindow 常用选项:选项
描述
bd
3D边框大小,默认不包含边框
bg
背景颜色
cursor
指定鼠标光标类型
borderwidth
边框宽度,默认值为 2 像素
handlepad
手柄和窗口边框距离,默认值为 8 像素
height
小部件高度
handlesize
手柄的大小,默认值为 8 像素
orient
并排放置子窗口,设置为 HORIZONTAL,从上到下放置子窗口,设置为 VERTICAL
sashpad
窗格填充
sashwidth
窗格边框宽度
sashrelief
窗格边框类型
showhandle
是否显示手柄,True/False
width
小组件的宽度
relief
边框的类型,默认值为 FLAT
PanedWindow 常用方法:方法
描述
add(child,options)
为窗格添加其他小部件
forget(child)
删除子部件
panecget(child, option)
获得子组件指定选项的值
paneconfig(child, **options)
设置子组件的各种选项
PanedWindow 方法选项:选项
描述
after
添加新的子组件到指定子组件后边
before
添加新的子组件到指定子组件前边
height
指定子组件的高度
minsize
控制窗格宽度/高度不得低于的值
padx
指定子组件的水平间距
pady
指定子组件的垂直间距
sticky
指定子组件位于窗格的位置(e、s、w、n,以及组合值)
width
指定子组件的宽度
示例:创建可调横向和纵向窗格import tkinter as tkroot = tk.Tk()root.geometry('600x400+200+200')root.title('PanedWindow 窗格窗口演示')pw = tk.PanedWindow(root, orient=tk.HORIZONTAL, showhandle=True)pw1 = tk.PanedWindow(root, orient=tk.HORIZONTAL, showhandle=True)left_Label = tk.Label(pw1, text="标签 1", bg="blue")pw1.add(left_Label, width=200)pw2 = tk.PanedWindow(pw, orient=tk.VERTICAL, showhandle=True)top_Label = tk.Label(pw2, text="标签 2", bg="green")pw2.add(top_Label, height=200)bottom_Label = tk.Label(pw2, text="标签 3", bg="red")pw2.add(bottom_Label)pw.add(pw1)pw.add(pw2)pw.pack(fill=tk.BOTH, expand=True)root.mainloop()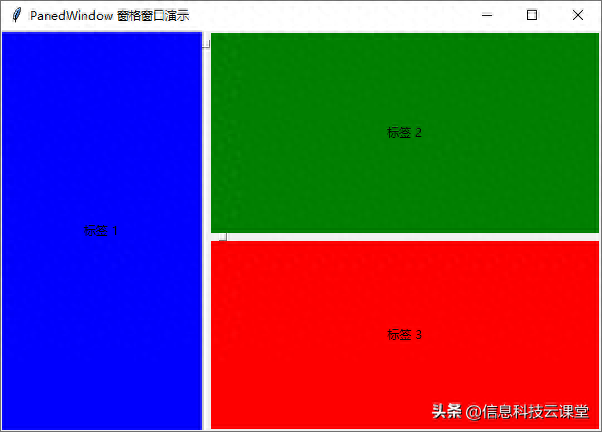 示例 :窗格窗口常用方法演示import tkinter as tkroot = tk.Tk()root.geometry('600x400+200+200')root.title('PanedWindow 窗格窗口演示')def add(): label = tk.Label(pw1, text="标签", bg="lightblue") pw1.add(label, before=left_Label, width=80, minsize=50)def remove(): pw1.forget(left_Label) def get(): print(pw2.panecget(top_Label, 'height'))def conf(): pw2.paneconfig(top_Label, height=80)pw = tk.PanedWindow(root, orient=tk.HORIZONTAL, showhandle=True)pw1 = tk.PanedWindow(root, orient=tk.HORIZONTAL, showhandle=True)left_Label = tk.Label(pw1, text="标签 1", bg="blue")pw1.add(left_Label, width=200)pw2 = tk.PanedWindow(pw, orient=tk.VERTICAL, showhandle=True)top_Label = tk.Label(pw2, text="标签 2", bg="green")pw2.add(top_Label, height=200)bottom_Label = tk.Label(pw2, text="标签 3", bg="red")pw2.add(bottom_Label)pw.add(pw1)pw.add(pw2)pw.pack(fill=tk.BOTH, expand=True)frame = tk.Frame(root)frame.pack()tk.Button(frame, text="增加", command=add).pack(side=tk.LEFT, padx=10)tk.Button(frame, text="删除", command=remove).pack(side=tk.LEFT, padx=10)tk.Button(frame, text="获取", command=get).pack(side=tk.LEFT, padx=10)tk.Button(frame, text="设置", command=conf).pack(side=tk.LEFT, padx=10)root.mainloop()
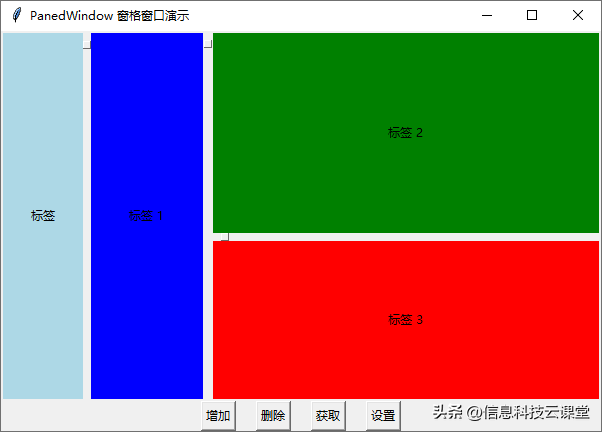
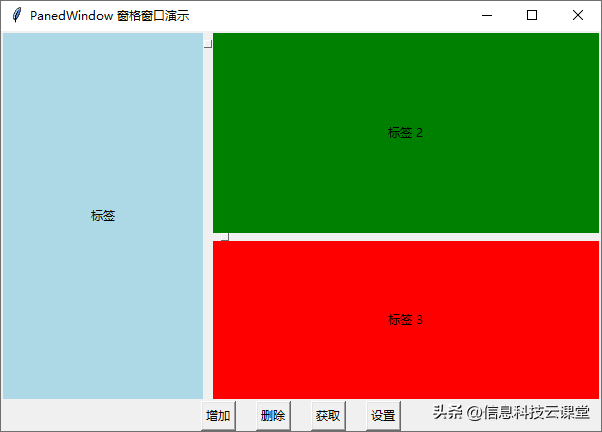
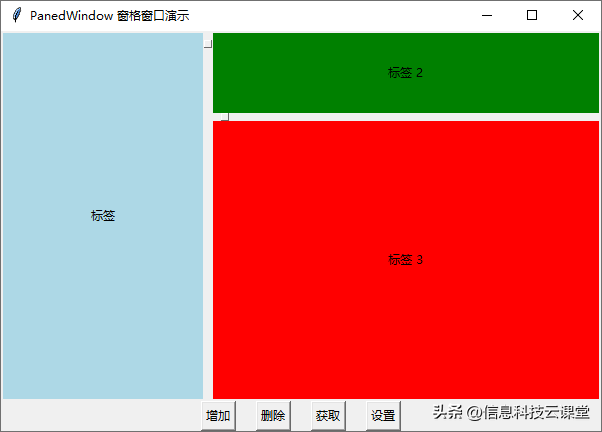
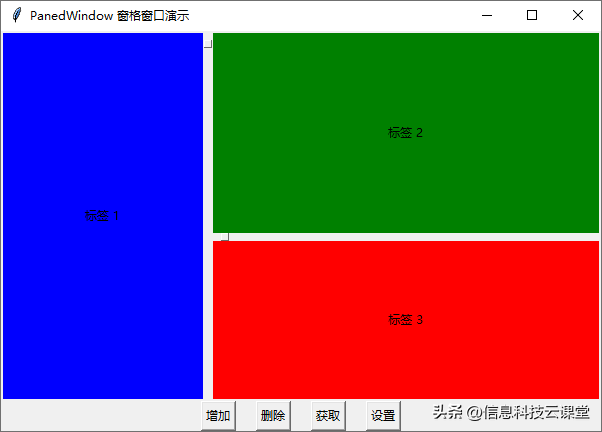
add() 方法:为左侧窗格再添加 Label 小部件
forget() 方法:删除左侧窗格的 left_Label 小部件
panecget() 方法: 获取 top_Label 组件 height 选项的值,输出到控制台
paneconfig() 方法:设置 top_Label 组件 height 选项的值为 80
 示例:窗格窗口中Text增加滚动条import tkinter as tkroot = tk.Tk()root.geometry('600x400+200+200')root.title('PanedWindow 窗格窗口演示')pw=tk.PanedWindow(root,orient=tk.VERTICAL,sashrelief='sunken') # 创建纵向窗格pw.pack(fill=tk.BOTH,expand=True) top_frame = tk.Frame(pw)tk.Label(top_frame, text='顶部Frame').pack() pw1=tk.PanedWindow(pw,orient=tk.HORIZONTAL,sashrelief='sunken') # 创建横向窗格label = tk.Label(pw1,text='左侧标签',width=15)right_frame = tk.Frame(pw1)text = tk.Text(right_frame,wrap="none") # 右侧多行文本框 scrollbar_h = tk.Scrollbar(right_frame,orient=tk.HORIZONTAL,command=text.xview) # 创建滚动条scrollbar_v = tk.Scrollbar(right_frame,command=text.yview)scrollbar_h.pack(side=tk.BOTTOM,fill=tk.X)scrollbar_v.pack(side=tk.RIGHT,fill=tk.Y)text.pack(side=tk.LEFT,fill=tk.BOTH,expand=True) text.config(xscrollcommand=scrollbar_h.set,yscrollcommand=scrollbar_v.set)pw1.add(label)pw1.add(right_frame)pw.add(top_frame,minsize=80)pw.add(pw1) root.mainloop()