Tkinter 可以使用几何布局管理器来组织窗口上的小部件。Tkinter 支持三种几何布局管理器:
packgridplace在本文中,将介绍 Tkinter 的几何布局管理器 pack 以及如何使用它在窗口上排列小部件。
下面,通过一个简单的示例来说明 pack 几何布局管理器的使用方法。
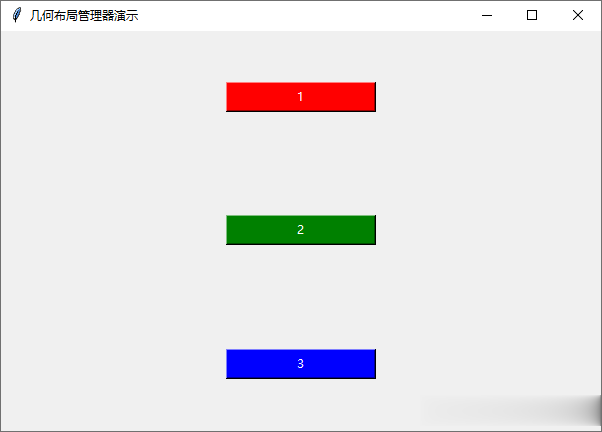
import tkinter as tkroot = tk.Tk()root.geometry('600x400+200+200')root.title('几何布局管理器演示')button1 = tk.Button(root, text='1',bg='red', fg='white', width=20)button2 = tk.Button(root, text='2',bg='green', fg='white', width=20)button3 = tk.Button(root, text='3',bg='blue', fg='white', width=20)button1.pack()button2.pack()button3.pack()root.mainloop()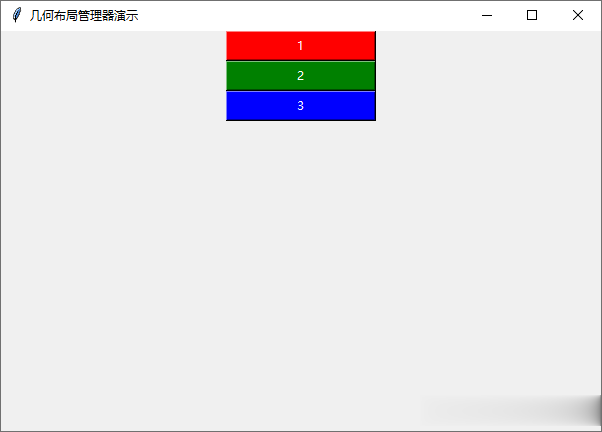
上面示例中,包含三个按钮,使用 pack() 进行布局 。默认情况下,小部件从上到下垂直居中排列。
pack() 支持多重参数进行自定义布局。
sideside 参数指定小部件布局向。该参数有四个可选选项:
'top':从上到下垂直排列小部件。'bottom':从下到上垂直排列小部件。'left':从左到右水平排列小部件。'right':从右到左水平排列小部件。还可以使用 Tkinter 模块提供的预定义常量:
tk.TOPtk.BOTTOMtk.LEFTtk.RIGHTimport tkinter as tkroot = tk.Tk()root.geometry('600x400+200+200')root.title('几何布局管理器演示')button1 = tk.Button(root, text='1',bg='red', fg='white', width=20)button2 = tk.Button(root, text='2',bg='green', fg='white', width=20)button3 = tk.Button(root, text='3',bg='blue', fg='white', width=20)button1.pack()button2.pack()button3.pack()button1 = tk.Button(root, text='1',bg='red', fg='white', width=20)button2 = tk.Button(root, text='2',bg='green', fg='white', width=20)button3 = tk.Button(root, text='3',bg='blue', fg='white', width=20)button1.pack(side=tk.BOTTOM)button2.pack(side=tk.BOTTOM)button3.pack(side=tk.BOTTOM)button1 = tk.Button(root, text='1',bg='red', fg='white', width=10)button2 = tk.Button(root, text='2',bg='green', fg='white', width=10)button3 = tk.Button(root, text='3',bg='blue', fg='white', width=10)button1.pack(side=tk.LEFT)button2.pack(side=tk.LEFT)button3.pack(side=tk.LEFT)button1 = tk.Button(root, text='1',bg='red', fg='white', width=10)button2 = tk.Button(root, text='2',bg='green', fg='white', width=10)button3 = tk.Button(root, text='3',bg='blue', fg='white', width=10)button1.pack(side=tk.RIGHT)button2.pack(side=tk.RIGHT)button3.pack(side=tk.RIGHT)root.mainloop()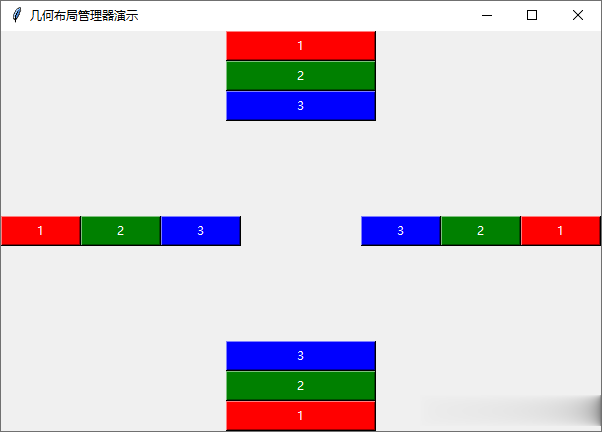 expand
expand 确定小部件是否应扩展以占用分配给容器的任何额外空间。
import tkinter as tkroot = tk.Tk()root.geometry('600x400+200+200')root.title('几何布局管理器演示')button1 = tk.Button(root, text='1',bg='red', fg='white', width=20)button2 = tk.Button(root, text='2',bg='green', fg='white', width=20)button3 = tk.Button(root, text='3',bg='blue', fg='white', width=20)button1.pack(side=tk.TOP, expand=True)button2.pack(side=tk.TOP, expand=False)button3.pack(side=tk.TOP, expand=False)root.mainloop()
以上示例,button1 使用参数 expand=True,扩展占用了容器的剩余空间。
expand 参数依赖于 side 参数,小部件的最大宽度(高度)可以与容器一样宽(高)。
如果三个按钮都使用参数 expand=True,则平分容器空间。
 fill
fillfill 参数确定小组件是否会直接占用可用空间,改变小组件的宽度或高度。它接受以下值:
tk.Xtk.Ytk.BOTH默认情况下,填充为 none。
import tkinter as tkroot = tk.Tk()root.geometry('600x400+200+200')root.title('几何布局管理器演示')button1 = tk.Button(root, text='1',bg='red', fg='white', width=20)button2 = tk.Button(root, text='2',bg='green', fg='white', width=20)button3 = tk.Button(root, text='3',bg='blue', fg='white', width=20)button1.pack(side=tk.TOP, expand=True, fill=tk.X)button2.pack(side=tk.TOP, expand=True, fill=tk.Y)button3.pack(side=tk.TOP, expand=True, fill=tk.BOTH)root.mainloop()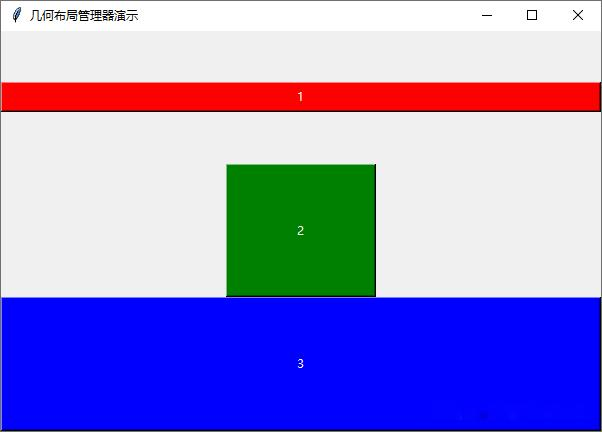
以上示例中,第一个按钮小部件沿 x 轴填充额外的空间。第二个按钮小部件沿 y 轴填充额外的空间。第三个按钮小部件在水平和垂直方向上占用任何额外的空间。
ipadx 、ipadyipadx 、ipady 参数为小部件创建内部填充,是组件文本跟组件边界之间的距离。ipadx 沿 x 轴创建填充。ipady 沿 Y 轴创建填充。
import tkinter as tkroot = tk.Tk()root.geometry('600x400+200+200')root.title('几何布局管理器演示')button1 = tk.Button(root, text='1',bg='red', fg='white')button2 = tk.Button(root, text='2',bg='green', fg='white')button3 = tk.Button(root, text='3',bg='blue', fg='white')button4 = tk.Button(root, text='4',bg='yellow', fg='red')button1.pack(side=tk.LEFT)button2.pack(side=tk.LEFT, ipadx=40)button3.pack(side=tk.LEFT, ipady=40)button4.pack(side=tk.LEFT, ipadx=80, ipady=80)root.mainloop() padx 、pady
padx 、pady 参数分别指定外部水平和垂直填充,是组件跟邻近组件或窗体边界的距离。
import tkinter as tkroot = tk.Tk()root.geometry('600x400+200+200')root.title('几何布局管理器演示')button1 = tk.Button(root, text='1',bg='red', fg='white')button2 = tk.Button(root, text='2',bg='green', fg='white')button3 = tk.Button(root, text='3',bg='blue', fg='white')button4 = tk.Button(root, text='4',bg='yellow', fg='red')button1.pack(side=tk.LEFT, padx=20)button2.pack(side=tk.LEFT, padx=40)button3.pack(side=tk.LEFT, padx=60)button4.pack(side=tk.LEFT, padx=80)root.mainloop()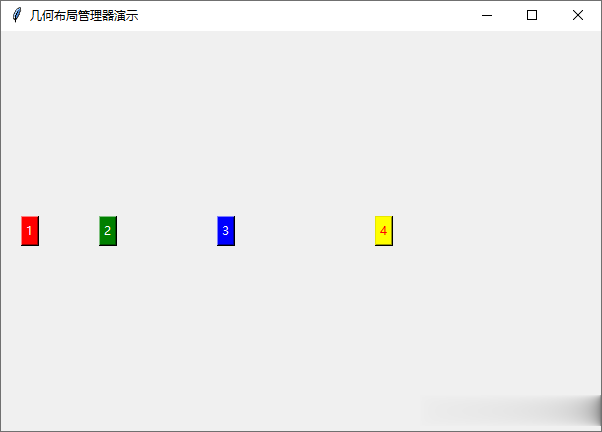 anchor
anchor 决定组件停靠的位置。
 import tkinter as tkroot = tk.Tk()root.geometry('600x400+200+200')root.title('几何布局管理器演示')button1 = tk.Button(root, text='1', bg='red', fg='white')button2 = tk.Button(root, text='2', bg='green', fg='white')button1.pack(anchor=tk.W, expand=True)button2.pack(anchor=tk.E, expand=True)root.mainloop()
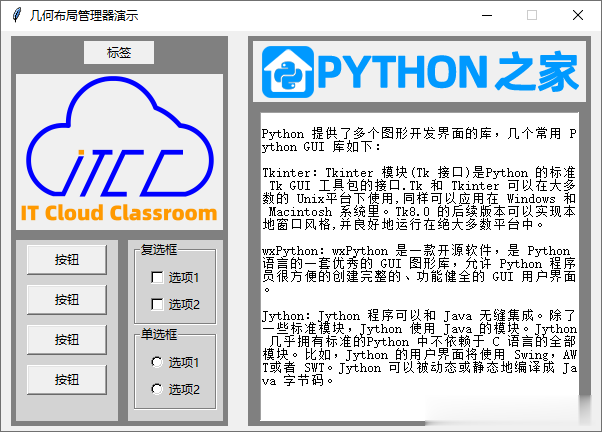
 pack 布局综合示例import tkinter as tkroot = tk.Tk()root.geometry('600x400+200+200')root.title('几何布局管理器演示')root.resizable(False, False)var1 =tk.IntVar()var2 =tk.BooleanVar()left_frame = tk.Frame(root, width=160, height=400, bg='grey')left_frame.pack(side='left', fill='both', padx=10, pady=5, expand=True)right_frame = tk.Frame(root, width=400, height=400, bg='grey')right_frame.pack(side='right', fill='both', padx=10, pady=5, expand=True)tk.Label(left_frame, text="标签").pack(side='top', padx=5, pady=5, ipadx=20)photo = tk.PhotoImage(file='ItYunKeTang.png')tk.Label(left_frame, image=photo).pack(fill='both', padx=5, pady=5)tool_bar1 = tk.Frame(left_frame, width=70, height=100, bg='lightgrey')tool_bar1.pack(side='left', fill='both', padx=5, pady=5, expand=True)tk.Button(tool_bar1, text="按钮", width=10).pack(padx=5, pady=5)tk.Button(tool_bar1, text="按钮", width=10).pack(padx=5, pady=5)tk.Button(tool_bar1, text="按钮", width=10).pack(padx=5, pady=5)tk.Button(tool_bar1, text="按钮", width=10).pack(padx=5, pady=5)tool_bar2 = tk.Frame(left_frame, width=70, height=100, bg='lightgrey')tool_bar2.pack(side='right', fill='both', padx=5, pady=5, expand=True)labelframe1 = tk.LabelFrame(tool_bar2, text='复选框', padx=10, pady=5, bg='lightgrey')labelframe1.pack()tk.Checkbutton(labelframe1, text='选项1', variable=var1, bg='lightgrey').pack()tk.Checkbutton(labelframe1, text='选项2', variable=var2, bg='lightgrey').pack(anchor=tk.W)labelframe2 = tk.LabelFrame(tool_bar2, text='单选框', padx=10, pady=5, bg='lightgrey')labelframe2.pack()tk.Radiobutton(labelframe2, text='选项1', variable=var2, value=1, bg='lightgrey').pack()tk.Radiobutton(labelframe2, text='选项2', variable=var2, value=2, bg='lightgrey').pack(anchor=tk.W)photo2 = tk.PhotoImage(file='logo1.png')label = tk.Label(right_frame, image=photo2)label.pack(fill='both', padx=5, pady=5)message ='''Python 提供了多个图形开发界面的库,几个常用 Python GUI 库如下:Tkinter:Tkinter 模块(Tk 接口)是Python 的标准 Tk GUI 工具包的接口.Tk 和 Tkinter 可以在大多数的 Unix平台下使用,同样可以应用在 Windows 和 Macintosh 系统里。Tk8.0 的后续版本可以实现本地窗口风格,并良好地运行在绝大多数平台中。wxPython:wxPython 是一款开源软件,是 Python 语言的一套优秀的 GUI 图形库,允许 Python 程序员很方便的创建完整的、功能健全的 GUI 用户界面。Jython:Jython 程序可以和 Java 无缝集成。除了一些标准模块,Jython 使用 Java 的模块。Jython 几乎拥有标准的Python 中不依赖于 C 语言的全部模块。比如,Jython 的用户界面将使用 Swing,AWT或者 SWT。Jython 可以被动态或静态地编译成 Java 字节码。'''text_box = tk.Text(right_frame, height=30, width=45)text_box.pack(pady=5)text_box.insert('end', message)text_box.config(state='disabled')root.mainloop()