前端时间我的一个朋友为了快速熟悉 Vue3 开发, 特意使用 electron+vue3+ts 开发了一个桌面端应用, 并在 github 上开源了, 接下来我就带大家一起了解一下这个项目, 在文章末尾我会放 github的地址, 大家如果想学习vue3 + ts + electron 开发, 可以本地 clone 学习参考一下.
关注并将「趣谈前端」设为星标
每天定时分享技术干货/优秀开源/技术思维

image.png
技术栈以上是我们看到的便签软件使用界面, 整体技术选型如下:
脚手架 vue-cli前端框架和语言规范 vue + typescript桌面端开发框架 electronelectron支持插件 vue-cli-plugin-electron-builder数据库 NeDB | 一款NoSQL嵌入式数据库代码格式规范 eslint接下来我们来看看具体的演示效果:

具体实现过程, 内容很长, 建议先点赞收藏, 再一步步学习, 接下来会就该项目的每一个重点细节做详细的分析.
开发思路1.页面:
列表页index.vue 头部、搜索、内容部分,只能有一个列表页存在设置页setting.vue 设置内容和软件信息,和列表页一样只能有一个存在编辑页 editor.vue icons功能和背景颜色功能,可以多个编辑页同时存在2.动效:
打开动效,有一个放大、透明度的过渡,放不了动图这里暂时不演示了。标题过渡效果切换index和setting时头部不变,内容过渡3.数据储存:
数据的创建和更新都在编辑页editor.vue进行,这个过程中在储存进nedb之后才通信列表页index.vue更新内容,考虑到性能问题,这里使用了防抖防止连续性的更新而导致卡顿(不过貌似没有这个必要。。也算是一个小功能吧,然后可以设置这个更新速度)
4.错误采集:采集在使用中的错误并弹窗提示
5.编辑显示:document暴露 execCommand 方法,该方法允许运行命令来操纵可编辑内容区域的元素。
在开发的时候还遇到过好多坑,这些都是在electron环境中才有,比如
@input触发2次,加上v-model触发3次。包括创建一个新的electron框架也是这样,别人电脑上不会出现这个问题,猜测是electron缓存问题vue3碰到空属性报错时无限报错,在普通浏览器(edge和chrome)是正常一次组件无法正常渲染不报错,只在控制台报异常打包后由于electron的缓存导致打开需要10秒左右,清除c盘软件缓存后正常其他的不记得了。。
这里暂时不提供vue3和electron介绍,有需要的可以先看看社区其他的有关文章或者后期再详细专门提供。软件命名为i-notes。
electron-vue里面的包环境太低了,所以是手动配置electron+vue3(虽然说是手动。。其实就两个步骤)
目录结构
electron-vue-notes├── public│ ├── css│ ├── font│ └── index.html├── src│ ├── assets│ │ └── empty-content.svg│ ├── components│ │ ├── message│ │ ├── rightClick│ │ ├── editor.vue│ │ ├── header.vue│ │ ├── input.vue│ │ ├── messageBox.vue│ │ ├── switch.vue│ │ └── tick.vue│ ├── config│ │ ├── browser.options.ts│ │ ├──Names.options.ts│ │ ├── editorIcons.options.ts│ │ ├── index.ts│ │ └── shortcuts.keys.ts│ ├── inotedb│ │ └── index.ts│ ├── less│ │ └── index.less│ ├── router│ │ └── index.ts│ ├── script│ │ └── deleteBuild.js│ ├── store│ │ ├── exeConfig.state.ts│ │ └── index.ts│ ├── utils│ │ ├── errorLog.ts│ │ └── index.ts│ ├── views│ │ ├── editor.vue│ │ ├── index.vue│ │ ├── main.vue│ │ └── setting.vue│ ├── App.vue│ ├── background.ts│ ├── main.ts│ └── shims-vue.d.ts├── .browserslistrc├── .eslintrc.js├── .prettierrc.js├── babel.config.js├── inoteError.log├── LICENSE├── package-lock.json├── package.json├── README.md├── tsconfig.json├── vue.config.js└── yarn.lock 使用脚手架搭建vue3环境没有脚手架的可以先安装脚手架
npm install -g @vue/cli创建vue3项目
vue create electron-vue-notes# 后续? Please pick a preset: (Use arrow keys) Default ([Vue 2] babel, eslint) Default (Vue 3 Preview) ([Vue 3] babel, eslint)> Manually select features # 手动选择配置# 后续所有配置? Please pick a preset: Manually select features? Check the features needed for your project: Choose Vue version, Babel, TS, Router, CSS Pre-processors, Linter? Choose a version of Vue.js that you want to start the project with 3.x (Preview)? Use-style component syntax? Yes? Use Babel alongside TypeScript (required for modern mode, auto-detected polyfills, transpiling JSX)? Yes? Use history mode for router? (Requires proper server setup for index fallback in production) No? Pick a CSS pre-processor (PostCSS, Autoprefixer and CSS Modules are supported by default): Less? Pick a linter / formatter config: Prettier? Pick additional lint features: Lint on save, Lint and fix on commit? Where do you prefer placing config for Babel, ESLint, etc.? In dedicated config files? Save this as a preset for future projects? (y/N) n
创建完之后的目录是这样的
electron-vue-notes├── public│ ├── favicon.ico│ └── index.html├── src│ ├── assets│ │ └── logo.png│ ├── components│ │ └── HelloWorld.vue│ ├── router│ │ └── index.ts│ ├── views│ │ ├── About.vue│ │ └── Home.vue│ ├── App.vue│ ├── main.ts│ └── shims-vue.d.ts├── .browserslistrc├── .eslintrc.js├── babel.config.js├── package.json├── README.md├── tsconfig.json└── yarn.lock 安装electron的依赖# yarnyarn add vue-cli-plugin-electron-builder electron# npm 或 cnpmnpm i vue-cli-plugin-electron-builder electron安装完之后完善一些配置,比如别名、eslint、prettier等等基础配置,还有一些颜色、icons等等具体可以看下面
项目的一些基础配置eslint使用eslint主要是规范代码风格,不推荐tslint是因为tslint已经不更新了,tslint也推荐使用eslint 安装eslint
npm i eslint -g进入项目之后初始化eslint
eslint --init# 后续配置? How would you like to use ESLint? To check syntax and find problems? What type of modules does your project use? JavaScript modules (import/export)? Which framework does your project use? Vue.js? Does your project use TypeScript? Yes? Where does your code run? Browser, Node? What format do you want your config file to be in? JavaScriptThe config that you've selected requires the following dependencies:eslint-plugin-vue@latest @typescript-eslint/eslint-plugin@latest @typescript-eslint/parser@latest? Would you like to install them now with npm? (Y/n) y
修改eslint配置,·.eslintrc.js,规则rules可以根据自己的喜欢配置 eslint.org/docs/user-g…[4]
module.exports = { root: true, env: { node: true }, extends: [ 'plugin:vue/vue3-essential', 'eslint:recommended', 'plugin:prettier/recommended', 'plugin:@typescript-eslint/eslint-recommended', '@vue/typescript/recommended', '@vue/prettier', '@vue/prettier/@typescript-eslint' ], parserOptions: { ecmaVersion: 2020 }, rules: { quotes: [1, 'single'], semi: 1, '@typescript-eslint/camelcase': 0, '@typescript-eslint/no-explicit-any': 0, 'no-irregular-whitespace': 2, 'no-case-declarations': 0, 'no-undef': 0, 'eol-last': 1, 'block-scoped-var': 2, 'comma-dangle': [2, 'never'], 'no-dupe-keys': 2, 'no-empty': 1, 'no-extra-semi': 2, 'no-multiple-empty-lines': [1, { max: 1, maxEOF: 1 }], 'no-trailing-spaces': 1, 'semi-spacing': [2, { before: false, after: true }], 'no-unreachable': 1, 'space-infix-ops': 1, 'spaced-comment': 1, 'no-var': 2, 'no-multi-spaces': 2, 'comma-spacing': 1 }}; prettier在根目录增加.prettierrc.js配置,根据自己的喜好进行配置,单行多少个字符、单引号、分号、逗号结尾等等
module.exports = { printWidth: 120, singleQuote: true, semi: true, trailingComma: 'none'}; tsconfig.json如果这里没有配置识别@/路径的话,在项目中使用会报错
"paths": { "@/*": [ "src/*" ]} package.json"author": "heiyehk","description": "I便笺个人开发者heiyehk独立开发,在Windows中更方便的记录文字。","main": "background.js","scripts": { "lint": "vue-cli-service lint", "electron:build": "vue-cli-service electron:build", "electron:serve": "vue-cli-service electron:serve"} 配置入口文件background.ts因为需要做一些打开和关闭的动效,因此我们需要配置electron为frame无边框和透明transparent的属性
/* eslint-disable @typescript-eslint/no-empty-function */'use strict';import { app, protocol, BrowserWindow, globalShortcut } from 'electron';import { createProtocol // installVueDevtools} from 'vue-cli-plugin-electron-builder/lib';const isDevelopment = process.env.NODE_ENV !== 'production';let win: BrowserWindow | null;protocol.registerSchemesAsPrivileged([ { scheme: 'app', privileges: { secure: true, standard: true } }]);function createWindow() { win = new BrowserWindow({ frame: false, // 无边框 hasShadow: false, transparent: true, // 透明 width: 950, height: 600, webPreferences: { enableRemoteModule: true, nodeIntegration: true } }); if (process.env.WEBPACK_DEV_SERVER_URL) { win.loadURL(process.env.WEBPACK_DEV_SERVER_URL); if (!process.env.IS_TEST) win.webContents.openDevTools(); } else { createProtocol('app'); win.loadURL('http://localhost:8080'); } win.on('closed', () => { win = null; });}app.on('window-all-closed', () => { if (process.platform !== 'darwin') { app.quit(); }});app.on('activate', () => { if (win === null) { createWindow(); }});app.on('ready', async () => { // 这里注释掉是因为会安装tools插件,需要屏蔽掉,有能力的话可以打开注释 // if (isDevelopment && !process.env.IS_TEST) { // try { // await installVueDevtools(); // } catch (e) { // console.error('Vue Devtools failed to install:', e.toString()); // } // } createWindow();});if (isDevelopment) { if (process.platform === 'win32') { process.on('message', data => { if (data === 'graceful-exit') { app.quit(); } }); } else { process.on('SIGTERM', () => { app.quit(); }); }} 启动yarn electron:serve
到这里配置就算是成功搭建好这个窗口了,但是还有一些其他细节需要进行配置,比如electron打包配置,模块化的配置等等
常规配置这里配置一些常用的开发内容和一些轮子代码, 大家可以参考 reset.csss 和 common.css 这两个文件.
config这个对应项目中的config文件夹
config├── browser.options.ts # 窗口的配置├──Names.options.ts # 样式名的配置,背景样式都通过这个文件渲染├── editorIcons.options.ts # 编辑页面的一些editor图标├── index.ts # 导出└── shortcuts.keys.ts # 禁用的一些快捷键,electron是基于chromium浏览器,所以也存在一些浏览器快捷键比如F5 browser.options这个文件的主要作用就是配置主窗口和编辑窗口区分开发正式的配置,宽高等等,以及要显示的主页面
/** * 软件数据和配置 * C:\Users\{用户名}\AppData\Roaming * 共享 * C:\ProgramData\Intel\ShaderCache\i-notes{xx} * 快捷方式 * C:\Users\{用户名}\AppData\Roaming\Microsoft\Windows\Recent * 电脑自动创建缓存 * C:\Windows\Prefetch\I-NOTES.EXE{xx} *//** */const globalEnv = process.env.NODE_ENV;const devWid = globalEnv === 'development' ? 950 : 0;const devHei = globalEnv === 'development' ? 600 : 0;// 底部icon: 40*40const editorWindowOptions = { width: devWid || 290, height: devHei || 350, minWidth: 250};/** * BrowserWindow的配置项 * @param type 单独给编辑窗口的配置 */const browserWindowOption = (type?: 'editor'): Electron.BrowserWindowConstructorOptions => { const commonOptions = { minHeight: 48, frame: false, hasShadow: true, transparent: true, webPreferences: { enableRemoteModule: true, nodeIntegration: true } }; if (!type) { return { width: devWid || 350, height: devHei || 600, minWidth: 320, ...commonOptions }; } return { ...editorWindowOptions, ...commonOptions };};/** * 开发环境: http://localhost:8080 * 正式环境: file://${__dirname}/index.html */const winURL = globalEnv === 'development' ? 'http://localhost:8080' : `file://${__dirname}/index.html`;export { browserWindowOption, winURL }; router增加meta中的title属性,显示在软件上方头部
 import { createRouter, createWebHashHistory } from 'vue-router';import { RouteRecordRaw } from 'vue-router';import main from '../views/main.vue';const routes: Array<RouteRecordRaw> = [ { path: '/', name: 'main', component: main, children: [ { path: '/', name: 'index', component: () => import('../views/index.vue'), meta: { title: 'I便笺' } }, { path: '/editor', name: 'editor', component: () => import('../views/editor.vue'), meta: { title: '' } }, { path: '/setting', name: 'setting', component: () => import('../views/setting.vue'), meta: { title: '设置' } } ] }];const router = createRouter({ history: createWebHashHistory(process.env.BASE_URL), routes});export default router; main.vue
main.vue文件主要是作为一个整体框架,考虑到页面切换时候的动效,分为头部和主体部分,头部作为一个单独的组件处理,内容区域使用router-view渲染。html部分,这里和vue2.x有点区别的是,在vue2.x中可以直接
// bad<transition name="fade"> <keep-alive> <router-view /> </keep-alive></transition>上面的这种写法在vue3中会在控制台报异常,记不住写法的可以看看控制台
<router-view v-slot="{ Component }"> <transition name="main-fade"> <div>然后就是ts部分了,使用vue3的写法去写,script标签注意需要写上lang="ts"代表是ts语法。router的写法也不一样,虽然在vue3中还能写vue2的格式,但是不推荐使用。这里是获取route的name属性,来进行一个页面过渡的效果。<script lang="ts">import { defineComponent, ref, onBeforeUpdate } from 'vue';import { useRoute } from 'vue-router';import Header from '@/components/header.vue';export default defineComponent({ components: { Header }, setup() { const routeName = ref(useRoute().name); onBeforeUpdate(() => { routeName.value = useRoute().name; }); return { routeName }; }});</script>less部分
<style lang="less" scoped>.main-fade-enter,.main-fade-leave-to { display: none; opacity: 0; animation: main-fade 0.4s reverse;}.main-fade-enter-active,.main-fade-leave-active { opacity: 0; animation: main-fade 0.4s;}@keyframes main-fade { from { opacity: 0; transform: scale(0.96); } to { opacity: 1; transform: scale(1); }}</style>以上就是main.vue的内容,在页面刷新或者进入的时候根据useRouter().name的切换进行放大的过渡效果,后面的内容会更简洁一点。
header.vueonBeforeRouteUpdate头部组件还有一个标题过渡的效果,根据路由导航获取当前路由的mate.title变化进行过渡效果。vue3中路由守卫需要从vue-route导入使用。
import { onBeforeRouteUpdate, useRoute } from 'vue-router';...onBeforeRouteUpdate((to, from, next) => { title.value = to.meta.title; currentRouteName.value = to.name; next();}); computed这里是计算不同的路由下标题内边距的不同,首页是有个设置入口的按钮,而设置页面是只有两个按钮,computed会返回一个你需要的新的值
 // 获取首页的内边距const computedPaddingLeft = computed(() => { return currentRouteName.value === 'index' ? 'padding-left: 40px;' : '';}); emit子传父和props父传子
vue3没有了this,那么要使用emit怎么办呢?在入口setup中有2个参数
setup(props, content) {}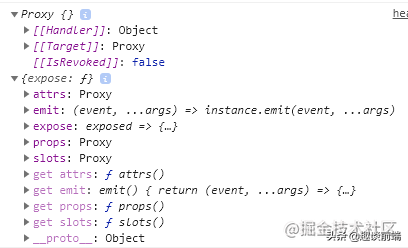
props是父组件传给子组件的内容,props常用的emit和props都在content中。
这里需要注意的是,使用props和emit需要先定义,才能去使用,并且会在vscode中直接调用时辅助弹窗显示
props示例
emit示例
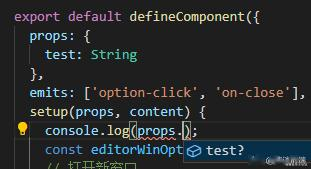
 export default defineComponent({ props: { test: String }, emits: ['option-click', 'on-close'], // 如果只用emit的话可以使用es6解构 // 如:setup(props, { emit }) setup(props, content) { console.log(props.test, content.emit('option-click')); }}) electron打开窗口import { browserWindowOption } from '@/config';import { createBrowserWindow, transitCloseWindow } from '@/utils';...const editorWinOptions = browserWindowOption('editor');// 打开新窗口const openNewWindow = () => { createBrowserWindow(editorWinOptions, '/editor');}; electron图钉固定屏幕前面
先获取当前屏幕实例
这里需要注意的是,需要从remote获取当前窗口信息
判断当前窗口是否在最前面isAlwaysOnTop(),然后通过setAlwaysOnTop()属性设置当前窗口最前面。
import { remote } from 'electron';...// 获取窗口固定状态let isAlwaysOnTop = ref(false);const currentWindow = remote.getCurrentWindow();isAlwaysOnTop.value = currentWindow.isAlwaysOnTop();// 固定前面const drawingPin = () => { if (isAlwaysOnTop.value) { currentWindow.setAlwaysOnTop(false); isAlwaysOnTop.value = false; } else { currentWindow.setAlwaysOnTop(true); isAlwaysOnTop.value = true; }}; electron关闭窗口这里是在utils封装了通过对dom的样式名操作,达到一个退出的过渡效果,然后再关闭。
// 过渡关闭窗口export const transitCloseWindow = (): void => { document.querySelector('#app')?.classList.remove('app-show'); document.querySelector('#app')?.classList.add('app-hide'); remote.getCurrentWindow().close();}; noteDb数据库安装nedb数据库,文档: www.w3cschool.cn/nedbintro/n…[5]
yarn add nedb @types/nedb数据储存在nedb中,定义字段,并在根目录的shims-vue.d.ts加入类型
/** * 储存数据库的 */interface DBNotes { Name: string; // 样式名 content: string; // 内容 readonly createdAt: Date; // 创建时间,这个时间是nedb自动生成的 readonly uid: string; // uid,utils中的方法生成 readonly updatedAt: Date; // update,自动创建的 readonly _id: string; // 自动创建的}对nedb的封装
这里的QueryDB是shims-vue.d.ts定义好的类型
这里的意思是QueryDB<T>是一个对象,然后这个对象传入一个泛型T,这里keyof T获取这个对象的key(属性)值,?:代表这个key可以是undefined,表示可以不存在。T[K]表示从这个对象中获取这个K的值。
type QueryDB<T> = { [K in keyof T]?: T[K];}; import Datastore from 'nedb';import path from 'path';import { remote } from 'electron';/** * @see https://www.npmjs.com/package/nedb */class INoteDB<G = any> { /** * 默认储存位置 * C:\Users\{Windows User Name}\AppData\Roaming\i-notes */ // dbPath = path.join(remote.app.getPath('userData'), 'db/inote.db'); // dbPath = './db/inote.db'; dbPath = this.path; _db: Datastore<Datastore.DataStoreOptions> = this.backDatastore; get path() { if (process.env.NODE_ENV === 'development') { return path.join(__dirname, 'db/inote.db'); } return path.join(remote.app.getPath('userData'), 'db/inote.db'); } get backDatastore() { return new Datastore({ /** * autoload * default: false * 当数据存储被创建时,数据将自动从文件中加载到内存,不必去调用loadDatabase * 注意所有命令操作只有在数据加载完成后才会被执行 */ autoload: true, filename: this.dbPath, timestampData: true }); } refreshDB() { this._db = this.backDatastore; } insert<T extends G>(doc: T) { return new Promise((resolve: (value: T) => void) => { this._db.insert(doc, (error: Error | null, document: T) => { if (!error) resolve(document); }); }); } /** * db.find(query) * @param {Query<T>} query:object类型,查询条件,可以使用空对象{}。 * 支持使用比较运算符($lt, $lte, $gt, $gte, $in, $nin, $ne) * 逻辑运算符($or, $and, $not, $where) * 正则表达式进行查询。 */ find(query: QueryDB<DBNotes>) { return new Promise((resolve: (value: DBNotes[]) => void) => { this._db.find(query, (error: Error | null, document: DBNotes[]) => { if (!error) resolve(document as DBNotes[]); }); }); } /** * db.findOne(query) * @param query */ findOne(query: QueryDB<DBNotes>) { return new Promise((resolve: (value: DBNotes) => void) => { this._db.findOne(query, (error: Error | null, document) => { if (!error) resolve(document as DBNotes); }); }); } /** * db.remove(query, options) * @param {Record<keyof DBNotes, any>} query * @param {Nedb.RemoveOptions} options * @return {BackPromise<number>} */ remove(query: QueryDB<DBNotes>, options?: Nedb.RemoveOptions) { return new Promise((resolve: (value: number) => void) => { if (options) { this._db.remove(query, options, (error: Error | null, n: number) => { if (!error) resolve(n); }); } else { this._db.remove(query, (error: Error | null, n: number) => { if (!error) resolve(n); }); } }); } update<T extends G>(query: T, updateQuery: T, options: Nedb.UpdateOptions = {}) { return new Promise((resolve: (value: T) => void) => { this._db.update( query, updateQuery, options, (error: Error | null, numberOfUpdated: number, affectedDocuments: T) => { if (!error) resolve(affectedDocuments); } ); }); }}export default new INoteDB(); 使用ref和reactive代替vuex,并用watch监听创建exeConfig.state.ts用ref和reactive引入的方式就可以达到vuex的state效果,这样就可以完全舍弃掉vuex。比如软件配置,创建exeConfig.state.ts在store中,这样在外部.vue文件中进行更改也能去更新视图。
import { reactive, watch } from 'vue';const exeConfigLocal = localStorage.getItem('exeConfig');export let exeConfig = reactive({ syncDelay: 1000, ... switchStatus: { /** * 开启提示 */ textTip: true }});if (exeConfigLocal) { exeConfig = reactive(JSON.parse(exeConfigLocal));} else { localStorage.setItem('exeConfig', JSON.stringify(exeConfig));}watch(exeConfig, e => { localStorage.setItem('exeConfig', JSON.stringify(e));}); vuex番外vuex的使用是直接在项目中引入useStore,但是是没有state类型提示的,所以需要手动去推导state的内容。这里的S代表state的类型,然后传入vuex中export declare Store<S> { readonly state: S; }
想要查看某个值的类型的时候在vscode中ctrl+鼠标左键点进去就能看到,或者鼠标悬浮该值
declare module 'vuex' { type StoreStateType = typeof store.state; export function useStore<S = StoreStateType>(): Store<S>;} index.vue这里在防止没有数据的时候页面空白闪烁,使用一个图片和列表区域去控制显示,拿到数据之后就显示列表,否则就只显示图片。在这个页面对editor.vue进行了createNewNote创建便笺笔记、updateNoteItem_className更新类型更改颜色、updateNoteItem_content更新内容、removeEmptyNoteItem删除、whetherToOpen是否打开(在editor中需要打开列表的操作)通信操作以及对软件失去焦点进行监听getCurrentWindow().on('blur'),如果失去焦点,那么在右键弹窗打开的情况下进行去除。deleteActiveItem_{uid}删除便笺笔记内容,这里在component封装了一个弹窗组件messageBox,然后在弹窗的时候提示是否删除和不在询问的功能操作。如果勾选不在询问,那么在store=>exeConfig.state中做相应的更改这里在设置中会进行详细的介绍开发一个vue3右键弹窗插件vue3也发布了有段时间了,虽然还没有完全稳定,但后面的时间出现的插件开发方式说不定也会多起来。插件开发思路
定义好插件类型,比如需要哪些属性MenuOptions判断是否需要在触发之后立即关闭还是继续显示在插入body时判断是否存在,否则就删除重新显示import { createApp, h, App, VNode, RendererElement, RendererNode } from 'vue';import './index.css';type ClassName = string | string[];interface MenuOptions { /** * 文本 */ text: string; /** * 是否在使用后就关闭 */ once?: boolean; /** * 单独的样式名 */ Name?: ClassName; /** * 图标样式名 */ iconName?: ClassName; /** * 函数 */ handler(): void;}type RenderVNode = VNode< RendererNode, RendererElement, { [key: string]: any; }>;class CreateRightClick { rightClickEl?: App<Element>; rightClickElBox?: HTMLDivElement | null; constructor() { this.removeRightClickHandler(); } /** * 渲染dom * @param menu */ render(menu: MenuOptions[]): RenderVNode { return h( 'ul', { : ['right-click-menu-list'] }, [ ...menu.map(item => { return h( 'li', { : item.className, // vue3.x中简化了render,直接onclick即可,onClick也可以 onclick: () => { // 如果只是一次,那么点击之后直接关闭 if (item.once) this.remove(); return item.handler(); } }, [ // icon h('i', { : item.iconName }), // text h( 'span', { : 'right-click-menu-text' }, item.text ) ] ); }) ] ); } /** * 给右键的样式 * @param event 鼠标事件 */ setRightClickElStyle(event: MouseEvent, len: number): void { if (!this.rightClickElBox) return; this.rightClickElBox.style.height = `${len * 36}px`; const { clientX, clientY } = event; const { innerWidth, innerHeight } = window; const { clientWidth, clientHeight } = this.rightClickElBox; let cssText = `height: ${len * 36}px;opacity: 1;transition: all 0.2s;`; if (clientX + clientWidth < innerWidth) { cssText += `left: ${clientX + 2}px;`; } else { cssText += `left: ${clientX - clientWidth}px;`; } if (clientY + clientHeight < innerHeight) { cssText += `top: ${clientY + 2}px;`; } else { cssText += `top: ${clientY - clientHeight}px;`; } cssText += `height: ${len * 36}px`; this.rightClickElBox.style.cssText = cssText; } remove(): void { if (this.rightClickElBox) { this.rightClickElBox.remove(); this.rightClickElBox = null; } } removeRightClickHandler(): void { document.addEventListener('click', e => { if (this.rightClickElBox) { const currentEl = e.target as Node; if (!currentEl || !this.rightClickElBox.contains(currentEl)) { this.remove(); } } }); } /** * 鼠标右键悬浮 * @param event * @param menu */ useRightClick = (event: MouseEvent, menu: MenuOptions[] = []): void => { this.remove(); if (!this.rightClickElBox || !this.rightClickEl) { const createRender = this.render(menu); this.rightClickEl = createApp({ setup() { return () => createRender; } }); } if (!this.rightClickElBox) { this.rightClickElBox = document.createElement('div'); this.rightClickElBox.id = 'rightClick'; document.body.appendChild(this.rightClickElBox); this.rightClickEl.mount('#rightClick'); } this.setRightClickElStyle(event, menu.length); };}export default CreateRightClick; 右键弹窗插件配合electron打开、删除便笺笔记在使用的时候直接引入即可,如在index.vue中使用创建右键的方式,这里需要额外的说明一下,打开窗口需要进行一个窗口通信判断,ipcMain需要从remote中获取
每个便笺笔记都有一个uid,也就是utils中生成的每个在打开笔记的时候也就是编辑页,需要判断该uid的窗口是否已经打开窗口之间用ipcRenderer和ipcMain去通信判断通信失败的方法,用一个定时器来延时判断是否通信成功,因为没有判断通信失败的方法countFlag = true就说明打开窗口,countFlag = false说明没有打开窗口ipcRenderer和ipcMain通信on是一直处于通信状态,once是通信一次之后就关闭了
// countFlag是一个状态来标记收到东西没// index问editor打开了没有ipcRenderer.send('你好')// 这时候editor收到消息了remote.ipcMain.on('你好', e => { // 收到消息后显示 remote.getCurrentWindow().show(); // 然后回index消息 e.sender.send('你好我在的');});// index在等editor消息ipcRenderer.on('你好我在的', () => { // 好的我收到了 countFlag = true;});// 如果没收到消息,那标记一直是false,根据定时器来做相应操作 右键弹窗的使用这里的打开笔记功能会把选中的笔记uid当作一个query参数跳转到编辑页
import CreateRightClick from '@/components/rightClick';...const rightClick = new CreateRightClick();...const contextMenu = (event: MouseEvent, uid: string) => { rightClick.useRightClick(event, [ { text: '打开笔记', once: true, iconName: ['iconfont', 'icon-newopen'], handler: () => { let countFlag = false; ipcRenderer.send(`${uid}_toOpen`); ipcRenderer.on(`get_${uid}_toOpen`, () => { countFlag = true; }); setTimeout(() => { if (!countFlag) openEditorWindow(uid); }, 100); } }, { text: '删除笔记', once: true, iconName: ['iconfont', 'icon-delete'], handler: () => { deleteCurrentUid.value = uid; if (exeConfig.switchStatus.deleteTip) { deleteMessageShow.value = true; } else { // 根据弹窗组件进行判断 onConfirm(); } } } ]);};... editor.vue重点这个editor.vue是view/文件夹下的,以下对本页面统称编辑页,更好区分editor组件和页面 开发思路
打开新增编辑页窗口时就生成uid并向数据库nedb添加数据,并向列表页通信ipcRenderer.send('createNewNote', res)需要使用富文本,能实时处理格式document.execCommand页面加载完时进行聚焦createRange和getSelection对列表页实时更新,编辑的时候防抖函数debounce可以控制输入更新,这个时间在设置是可控的图钉固定在header.vue已经说明选项功能能选择颜色,打开列表之后需要判断是否已经打开列表窗口在点击关闭的时候需要删除数据库本条数据,如果没有输入内容就删除数据库uid内容并向列表页通信removeEmptyNoteItem在列表页时关闭本窗口的一个通信deleteActiveItem_{uid}列表页打开笔记时,携带uid,在编辑页根据是否携带uid查询该条数据库内容富文本编辑做成了一个单独的组件,使编辑页的代码不会太臃肿
document.execCommand文档 developer.mozilla.org/zh-CN/docs/…[6]
首先在编辑页对路由进行判断是否存在,如果不存在就创建,否则就查询并把查询到的笔记传给editor组件
<Editor :content="editContent" :className="currentBgClassName" @on-input="changeEditContent" /> const routeUid = useRoute().query.uid as string;if (routeUid) { // 查询 uid.value = routeUid; getCurUidItem(routeUid);} else { // 生成uid并把uid放到地址栏 const uuidString = uuid(); uid.value = uuidString; useRouter().push({ query: { uid: uuidString } }); // 插入数据库并向列表页通信 ...} 富文本聚焦和ref获取dom节点原理是通过getSelection选择光标和createRange文本范围两个方法,选中富文本节点。获取
import { defineComponent, onMounted, ref, Ref, watch } from 'vue';...// setup中创建一个和<div ref="editor">同名的变量,就可以直接拿到dom节点,一定要return!!!let editor: Ref<HTMLDivElement | null> = ref(null);onMounted(() => { focus();});const focus = () => { const range = document.createRange(); range.selectNodeContents(editor.value as HTMLDivElement); range.collapse(false); const selecton = window.getSelection() as Selection; selecton.removeAllRanges(); selecton.addRange(range);};...return { editor, ...} editor组件的父传子以及watch监听这里需要注意的是因为在父组件传给子组件,然后子组件进行更新一次会导致富文本无法撤回,相当于重新给富文本组件赋值渲染了一次,因此这里就只用一次props.content
export default defineComponent({ props: { content: String, Name: String }, emits: ['on-input'], setup(props, { emit }) { let editor: Ref<HTMLDivElement | null> = ref(null); const bottomIcons = editorIcons; const editorContent: Ref<string | undefined> = ref(''); // 监听从父组件传来的内容,因为是从数据库查询所以会有一定的延迟 watch(props, nv => { if (!editorContent.value) { // 只赋值一次 editorContent.value = nv.content; } }); }}); editor组件的防抖子传父exeConfig.syncDelay是设置里面的一个时间,可以动态根据这个时间来调节储存进数据库和列表的更新,获取富文本组件的html然后储存到数据库并传到列表页更新
const changeEditorContent = debounce((e: InputEvent) => { const editorHtml = (e.target as Element).innerHTML; emit('on-input', editorHtml);}, exeConfig.syncDelay); 富文本组件的粘贴纯文本vue自带的粘贴事件,@paste获取到剪切板的内容,然后获取文本格式的内容e.clipboardData?.getData('text/plain')并插入富文本
const paste = (e: ClipboardEvent) => { const pasteText = e.clipboardData?.getData('text/plain'); console.log(pasteText); document.execCommand('insertText', false, pasteText);}; (额外的)getCurrentInstance选择dom方式官方和网上的例子是这样:
<div ref="editor"></div> setup(props, { emit }) { let editor = ref(null); return { editor }})直接获取dom节点,但其实不管这个editor是什么,只要从setup中return,就会直接标记instance变量名,强行把内容替换成dom节点,甚至不用定义可以看看下面例子
<div ref="test"></div> import { defineComponent, getCurrentInstance, onMounted } from 'vue';...setup(props, { emit }) { onMounted(() => { console.log(getCurrentInstance().refs); // 得到的是test dom以及其他定义的节点 }); return { test: '' }})
但是为了规范还是使用下面这样
<div ref="dom"></div> const dom = ref(null);return { dom}; setting.vue这里的话需要用到exeConfig.state.ts的配置信息,包括封装的input、switch、tick组件
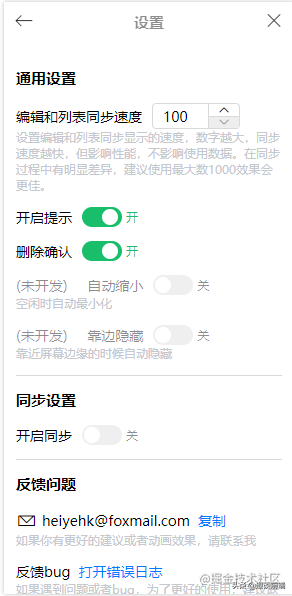
在这里说明一下,自动缩小、靠边隐藏和同步设置暂时还没有开发的
自动缩小: 编辑页失去焦点时自动最小化,获得焦点重新打开靠边隐藏: 把软件拖动到屏幕边缘时,自动隐藏到边上,类似QQ那样的功能同步设置: 打算使用nestjs做同步服务,后面可能会出一篇有关的文章,但是功能一定会做的 directives自定义指令
根据是否开启提示的设置写的一个方便控制的功能,这个功能是首先获取初始化的节点高度,放置在dom的自定义数据上面data-xx,然后下次显示的时候再重新获取赋值css显示,当然这里也是用了一个过渡效果
使用方法
<div v-tip="switch"></div> export default defineComponent({ components: { Tick, Input, Switch }, directives: { tip(el, { value }) { const { height } = el.dataset; // 储存最初的高度 if (!height && height !== '0') { el.dataset.height = el.clientHeight; } const clientHeight = height || el.clientHeight; let cssText = 'transition: all 0.4s;'; if (value) { cssText += `height: ${clientHeight}px;opacity: 1;`; } else { cssText += 'height: 0;opacity: 0;overflow: hidden;'; } el.style.cssText = cssText; } }}) 原生点击复制原理是先隐藏一个input标签,然后点击的之后选择它的内容,在使用document.execCommand('copy')复制就可以
<a @click="copyEmail">复制</a><input>打开文件夹使用shell这个方法import { remote } from 'electron';remote.shell.showItemInFolder('D:');打开默认浏览器链接
import { remote } from 'electron';remote.shell.openExternal('www.github.com'); 错误收集收集一些使用中的错误,并使用message插件进行弹窗提示,软件宽高和屏幕宽高只是辅助信息。碰到这些错误之后,在软件安装位置输出一个inoteError.log的错误日志文件,然后在设置中判断文件是否存在,存在就打开目录选中。
版本号时间错误electron版本Windows信息软件宽高信息屏幕宽高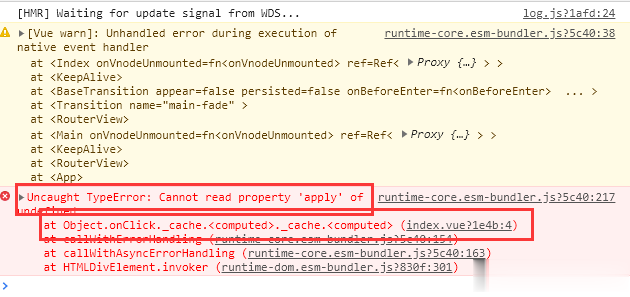
比如这个框中的才是主要的信息
vue3 errorHandlermain.ts我们需要进行一下改造,并使用errorHandler进行全局的错误监控
import { createApp } from 'vue';import App from './App.vue';import router from './router';import outputErrorLog from '@/utils/errorLog';const app = createApp(App);// 错误收集方法app.config.errorHandler = outputErrorLog;app.use(router).mount('#app'); errorLog.ts封装对Error类型输出为日志文件获取软件安装位置remote.app.getPath('exe')获取软件安装路径,包含软件名.exe
export const errorLogPath = path.join(remote.app.getPath('exe'), '../inoteError.log'); 输出日志文件flag: a代表末尾追加,确保每一行一个错误加上换行符'\n'
fs.writeFileSync(errorLogPath, JSON.stringify(errorLog) + '\n', { flag: 'a' });errorLog.ts的封装,对Error类型的封装
import { ComponentPublicInstance } from 'vue';import dayjs from 'dayjs';import fs from 'fs-extra';import os from 'os';import { remote } from 'electron';import path from 'path';import useMessage from '@/components/message';function getShortStack(stack?: string): string { const splitStack = stack?.split('\n '); if (!splitStack) return ''; const newStack: string[] = []; for (const line of splitStack) { // 其他信息 if (line.includes('bundler')) continue; // 只保留错误文件信息 if (line.includes('?!.')) { newStack.push(line.replace(/webpack-internal:\/\/\/\.\/node_modules\/.+\?!/, '')); } else { newStack.push(line); } } // 转换string return newStack.join('\n ');}export const errorLogPath = path.join(remote.app.getPath('exe'), '../inoteError.log');export default function(error: unknown, vm: ComponentPublicInstance | null, info: string): void { const { message, stack } = error as Error; const { electron, chrome, node, v8 } = process.versions; const { outerWidth, outerHeight, innerWidth, innerHeight } = window; const { width, height } = window.screen; // 报错信息 const errorInfo = { errorInfo: info, errorMessage: message, errorStack: getShortStack(stack) }; // electron const electronInfo = { electron, chrome, node, v8 }; // 浏览器窗口信息 const browserInfo = { outerWidth, outerHeight, innerWidth, innerHeight }; const errorLog = { versions: remote.app.getVersion(), date: dayjs().format('YYYY-MM-DD HH:mm'), error: errorInfo, electron: electronInfo, window: { type: os.type(), platform: os.platform() }, browser: browserInfo, screen: { width, height } }; useMessage('程序出现异常', 'error'); if (process.env.NODE_ENV === 'production') { fs.writeFileSync(errorLogPath, JSON.stringify(errorLog) + '\n', { flag: 'a' }); } else { console.log(error); console.log(errorInfo.errorStack); }}使用此方法后封装的结果是这样的,message插件具体看component

这个是之前的错误日志文件
 获取electron版本等信息const appInfo = process.versions; 打包
这个倒是没什么好讲的了,主要还是在vue.config.js文件中进行配置一下,然后使用命令yarn electron:build即可,当然了,还有一个打包前清空的旧的打包文件夹的脚本
deleteBuild.js打包清空dist_electron旧的打包内容,因为eslint的原因,这里就用eslint-disable关掉了几个
原理就是先获取vue.config.js中的打包配置,如果重新配置了路径directories.output就动态去清空
const rm = require('rimraf');const path = require('path');const pluginOptions = require('../../vue.config').pluginOptions;let directories = pluginOptions.electronBuilder.builderOptions.directories;let buildPath = '';if (directories && directories.output) { buildPath = directories.output;}// 删除作用只用于删除打包前的buildPath || dist_electron// dist_electron是默认打包文件夹rm(path.join(__dirname, `../../${buildPath || 'dist_electron'}`), () => {});以上就是本篇主要开发内容了,欢迎支持我的开源项目electron-vue3-inote。
相关资料
github地址: https://github.com/heiyehk/electron-vue3-inote
❤️ 看完三件事
如果你觉得这篇内容对你挺有启发,欢迎点赞+关注, 估计作者持续创作更高质量的内容.
